I decided to prepare an article with tips on enhancing the Wi-Fi network signal. On the Internet, there are many different articles on this topic, but in almost every article, there is a lot of unnecessary information. More precisely, a lot of recommendations on some settings that have nothing to do with increasing the radius of the Wi-Fi signal and in no way can affect the radius of the network itself.
If we are talking about enhancing the Wi-Fi signal, then of course we have just the radius of coverage of the network itself, that is, the range of Wi-Fi. For example: we bought a router, installed, configured, and in the farthest rooms Wi-Fi does not catch at all, or the signal level is too weak. Or, the router is installed on the first floor (where the signal is), and on the second floor the signal is already very weak, or completely absent. The usual situation that many people face, but I myself came across this.
What determines the range of a Wi-Fi network? A lot of different factors: from the router itself (number and strength of antennas), from the walls in your house, from the number of neighboring Wi-Fi networks, from the location of the router, some other interference, etc. Many ask for advice from a router that, for example, will provide a stable Wi-Fi signal for a two-bedroom apartment, a private house, and etc. In such cases, it is impossible to advise anything concrete. Everyone has different conditions, different walls, etc. The only thing I can advise is to approximately focus on the area of \u200b\u200byour house. If you have, for example, a one-room apartment, then even an inexpensive router with one antenna power of 3 dBi will cope with its task without any problems. Well, if you have a house, or a larger apartment, then take the device more expensive. Although, the price is not always an argument. I have - dear, three antennas, some sort of Asus proprietary feature that increases the network coverage radius. So, under the same conditions, at the same distance, he shows the result is not much better than the same. Which has internal antennas, and it’s several times cheaper.
How to strengthen the Wi-Fi signal in the settings of the router?
If you have already bought and installed a router at home or in the office, and Wi-Fi does not catch wherever you need, then you can try to strengthen the wireless network. How to do this, we will now consider. You can amplify the signal using the settings in the router, as well as using separate devices and devices.
1 Search and change the channel on the router. If your devices see many of the networks of your neighbors accessible for connection, then all these networks can load the channel on which your network works, and thereby reduce the radius of the network.
You can try setting a static channel in the router settings, or set Auto. Here you need to experiment. If you are not too lazy, then using the inSSIDer program you can find a more free channel and set it in the settings of your router.
I will not describe in detail, I just give you a link to an article In it I talked in detail about channels, and how to find an unloaded channel. Also, there is instructions for changing the channel on routers of different manufacturers.
2 Putting your network into 802.11N mode. As a rule, by default on all routers the wireless network operates in b / g / n (11bgn mixed) mixed mode. If you force the router to broadcast Wi-Fi in 802.11N operating mode, then this can increase not only the speed, but also the radius of Wi-Fi coverage (if your router has more than one antenna).
The only problem is that if you have older devices that do not support 802.11N mode, then they simply will not see your network. If you do not have old devices, then without a doubt switch your network to n mode. It is very easy to do. We go into the settings of the router, usually at 192.168.1.1, or 192.168.0.1 (for detailed instructions on entering the settings, see).
In the settings, open the tab where the wireless network is configured. They are usually called as follows: Wi-Fi, Wireless mode, Wireless network, Wireless, etc. Find the item there Wireless mode (Mode) and set in it N only. That is, the network only works in N.
For example: changing the wireless mode on the Asus router

Save the settings and reboot the router. If there are problems with connecting devices, then return the mixed mode back.
3 Check the transmit power in the router settings. On some routers, it is possible to set the power level of a wireless Wi-Fi network. As far as I know, the default is maximum power. But, you can check.
In Asus routers, these settings change on the tab Wireless network - Professionally. At the very bottom, there is an item " Tx power transmission power control. There is a scale that can be adjusted as a percentage. It looks like this:

On Tp-Link routers, open the tab Wireless - Wireless advanced. Paragraph Transmit power allows you to adjust the signal strength. High value means maximum power.

These settings are more useful if you want the other way around, to reduce the signal strength of your Wi-Fi router.
How to increase the range of a Wi-Fi network using additional devices?
1 Installing a repeater, or setting up a second router in amplifier mode. Of all the recommendations that you will see here, or even find on the Internet, this method is the most effective and reliable. True, you will have to spend money on a repeater.
As a repeater, ordinary routers can act. Here are the instructions for setting up ZyXEL and Asus routers in repeater mode:
If your Wi-Fi does not “finish off” into some rooms, then installing a repeater will solve this problem. And if you have a house with several floors, then on the ground floor you can install a router, and on the second floor a repeater. Excellent and working scheme.
2 Change router antennas to more powerful ones. If your router has removable antennas, then you can buy more powerful ones, and thereby slightly increase the coverage of your network. Why a little? Yes, because replacing antennas as a rule does not give a very good result. It is, but not such that it would increase the radius of several rooms. In any case, you have to spend money on antennas. And it seems to me that it is much better to spend this money on a repeater. Yes, it will cost more, but its benefits are much greater.
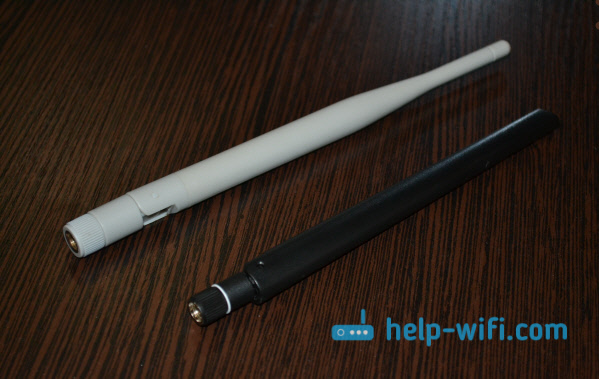
If you decide to change the antenna, then take powerful, with a gain of 8 dBi. But, they are expensive, and several such antennas will cost as a repeater.
I already wrote, you can see the results.
3 Buying a new router, switching to 5 GHz. You can buy a more powerful, expensive router. And better, a router with support for the 5 GHz band. What is the plus of the 5 GHz band? It is practically free, now most of all networks and other devices operate in the 2.4 GHz band. Less interference - more speed and a greater range of the network.
There are places where the 2.4 GHz Wi-Fi network practically does not work. All the time it’s buggy, the connection disappears, low speed, etc. And all because there are so many different networks. In such cases, switching to 5 GHz solves all problems.
1 Choose the correct location for your router. This is actually a very good and effective tip. As a rule, everyone installs routers at the entrance, or in some distant rooms. The correct location of the router will allow you to correctly distribute the signal, thereby increasing the range of Wi-Fi.
Simply put, you need to install the router as close to the center of the house as possible. Yes, this does not always work, since you need to lay a cable to the router, and pulling it to the middle of the house is not very convenient. But, even minor movements of the router, can increase the network level in the rooms you need. And also, you need to remember that walls are the enemy of Wi-Fi networks.
2 Homemade amplifiers for Wi-Fi antennas. You can find many instructions that show the manufacture of amplifiers for the router. As a rule, this is ordinary foil, and cans. It turns out that if you put a sheet of foil on one side of the antenna, the signal will be beaten off from it and sent in the direction we need.

I believe that this is all nonsense. Firstly, a cut can of beer, or a piece of foil behind the router does not look very nice, and secondly, there is practically no effect on this. You can check.
Here are some tips. I think you have found a suitable way for yourself to increase the range of a Wi-Fi network. Share your tips in the comments!
Wireless networks are so popular that the time will soon come and they will completely supersede classic cable communications. This is hindered by some technological features of wireless communications. One of its weaknesses is the Wi-Fi coverage area. Its users are always lacking, as it is limited by a number of factors. Ordinary case: the router is installed in a three-room apartment according to all the rules, but in the farthest corners the signal level drops to almost zero. Accordingly, the question arises - how to increase the WiFi network and expand the coverage area. There are several options for resolving the issue.
1. Signal strength of the access point
As you know, the signal power is directly proportional to the distance. Therefore, in order to get the maximum range of Wai-Fai, it is necessary to unscrew the transmitter power to the maximum. This is usually done in the basic parameters of the network (although sometimes this item is hidden in advanced options).

On some routers, the power is set as a percentage, and on some there are simply fixed values \u200b\u200bof “weak”, “medium” and “strong”.

There are also models where this option is generally inaccessible to the user. True, in this case, as a rule, the power is already set to maximum.
In addition, different manufacturers come up with various additional functions to increase the WiFi coverage area. A vivid example is the latest firmware for D-Link DIR-300 and DIR-615 routers, where a Boost mode has appeared, which allows increasing the signal power up to 300%. True, it is worth mentioning that this function is more likely to cover a large area or open spaces. If you turn it on in the apartment, you risk creating problems not only for yourself, but also for your neighbors. The speed and quality of the wireless network also depends on the density, which, in turn, is inversely proportional to power. The opposite effect will be obtained: it seems that the signal level is perfect, and the pages open barely, the speed jumps and there are disconnections.
2. Directional and omnidirectional antennas
In addition to the transmitter itself, the antennas used at the access point have a strong influence on the quality of the wireless network. Unfortunately, in most cases, low-cost omnidirectional antennas of 2-3 dBi are installed on inexpensive home devices. At best, at 5 dBi. If you replace them with more powerful ones - 9 or 12 dBi - you can increase the coverage area of \u200b\u200bthe WiFi router by a third.

But here it must be borne in mind that the final result directly depends on environmental conditions (the material from which the walls, floors, the presence of interference and "neighbors" in the range are made of.
If you need to expand the coverage in a specific direction, you can buy a special directional antenna, connect it via the RP-SMA connector with a special cable and put it in the right place.

You can pick up equipment that will cover a fairly large area. It’s a very convenient thing, but only the prices bite and for the average user it’s already quite an expensive “pleasure”.
For those who have a modem or router with internal antennas, that is, hidden in the case, this option will not work at all. In their situation, there are two ways out - either to change the head unit, or to buy additional devices, which I will discuss below.
3. WDS and repeaters
This way to expand the Wi-Fi zone is the most correct from the point of view of the concept of building wireless networks. But it is also the most expensive, as it involves the purchase of additional devices - the so-called repeaters (Repeater) or expanders (Extender). Whatever you call it, there’s only one point: increase the WiFi coverage radius. The principle of their action is clearly shown in the picture:

That is, the repeater picks up the signal where the reception is still good enough and repeats it further, to the place where the “head” transmitter no longer reaches. In this case, the same radio channel is used. Unfortunately, the use of such devices somewhat reduces the overall speed of data transmission "over the air" (including the main access point). But here you already have to choose - either speed or range.
Note: You can use a router that supports WDS technology as a repeater. You can read more about how to configure this feature.

Only this method allows you to organize the so-called seamless wifi, allowing the client to move from point to point without breaking the connection. True, in this case it is necessary to purchase a separate controller and devices with support for 802.11r and 802.11k protocols. The most popular access points for these purposes are Mikrotik, Edimax, Ubiquity and Zyxel.
How to increase WiFi network coverage: 12 comments
- Victor
XasaH, for my part, I want to note that the coverage area also directly depends on the power of the transmitter installed in the router. It is impossible from a weak cheap router with a 2dbi antenna and a maximum wifi speed of 150 mb / s to require coverage of a 4-room apartment of 80+ sq.m .; in this case, it is enough to replace the router with a more powerful model with 2-3 or even 4 installed antennas and more powerful built-in chips.
- Xasah Posted by
I agree! Better to take a more powerful model. But in principle, with the help of 9 dBi antennas I was able to significantly improve the wireless network on the old D-Links.
- alexander
About twisting the outgoing signal power, complete nonsense! Yes, the signal will be visible at a distant point, but the quality of work at this very point will be poor, because The transmitter power, for example, a mobile phone is 15-18 dB, which is lower than that of the access point (20 dB for the soho segment), so it turns out that the phone sees the network, but it is not enough to transmit information to the power point.
The use of repeaters is spelled correctly, which reduces overall speed. Reduces significantly, almost 2 times. Therefore, it is best to use not radio bridges, but cable ones. Those. To connect the access point to the router with a cable, both the speed and integrity of the LKS will remain.
The acquisition of antennas with an increased power factor is not only power, but also sensitivity. Those. Such an antenna will “hear” distant low-power gadgets. But at the same time, she will also hear neighboring access points, and with a large radius, i.e. There will be more enemies, which means more noise and collisions in the transfer and a decrease in the overall file transfer speed.
Vobschem radio is not just for you. All of the above methods are ideal in villages or a private house. But in high-rise buildings with semi-carton walls, this is microwave hell. By the way, yes, overestimating the power at the access point (above 20db-100mW) is very much at risk of health. So it’s worth considering whether to overcharge the program / hardware, or it’s better to buy another access point.
- Paul
It is very interesting and informative and I would also like to get acquainted with such a popular thing as WiFi extenders based on Ubiquiti Nanostation M2, M5
- Dmitriy
for these purposes - Microtic, Edimax
Correct spelling of MikroTik through K
😀 - Dmitriy
Touching seamless roaming, on the Mikrotik equipment we connected a townhouse on 3 routers, in each corner + street the speed is at least 70 Mbps.
Any of the routers can be made as a controller, and shove it into roaming, select the desired power, up to 1 W. In general, the impressions of Mikrotik are only the best, the price is cheap, the quality and performance are at the highest level - Xasah Posted by
Within an apartment and a private house, increasing the power in practice really allows you to expand the network and it works tolerably. For the vast majority of ordinary users who need to expand the network to the corner of their apartment, this is enough. I do not consider the industrial scale. Same thing with the antenna. By the way, now for those who have the financial ability, they can mount seamless Wi-Fi throughout the area and use the access points that I mentioned above. They can be either repeaters or cable extenders connected via PoE.http: // site / selskiy-wifi-rostelekom /
In short - you need the 210th model and firmware on it. - Mikhail Nikolaevich
“Directional and omnidirectional antennas” “Omni-directional” antennas do not exist. Pin antennas in routers do not emit (and do not receive) in the direction of the pin axis. And most strongly emit and receive a signal in all directions perpendicular to the pin. Those. they are actually orthogonal directed. Therefore, theoretically, if you put the pin vertically, then you will "see" the routers in all apartments on your floor. And if you tilt it horizontally, you can scan a vertical cut of the apartments of the house. In practice, the radiation pattern is not flat, but a donut, in addition, reflection, scattering and re-radiation blur this picture.
Directional antennas do not increase the number of neighbors received, as Alexander writes. Because in the direction of maximum directivity, the range and the number of neighbors and interference increase, but at the same time the amount of interference from other directions decreases. The antenna is placed in the direction of your laptop. (Pin perpendicular to the laptop) The useful signal level increases and the communication distance increases with a directional antenna. But it grows as long as the level of the useful signal is greater than the level of internal interference of the router. Therefore, to reduce noise, space antenna receivers or thermal imagers of anti-tank shells cool ...
Whip antennas with a higher directivity (gain) located vertically will distribute the signal mainly horizontally. The greater their directivity, the more power will be radiated horizontally. And such antennas will be better to see laptops in the far rooms of their apartment. Coverage area will grow.
But simply increasing the power of the router will increase its “audibility”, but the router itself will not hear the laptop or smartphone better. Therefore, increasing the power of the router can increase the range, but may not give anything.
How to increase the range of Wi-Fi is a question that worries almost every owner of a router. The fact is that in large rooms the signal level is greatly reduced even at a relatively small distance from the signal source. This, in turn, negatively affects the connection speed.
How to increase the coverage area of \u200b\u200ba wireless router
The lower the signal level, the higher the probability of losing data packets. What to do in this case? How to increase the range of a Wi-Fi network?
There are several ways to increase your home’s Wi-Fi coverage:
- Proper network organization (location of the router).
- Improve reception with enhanced antennas.
- The use of repeaters (signal amplifiers or so-called repeaters).
- Setting up the second router in the "Bridge" mode.
As you can see, there are a lot of ways. Of course, almost all of them require certain financial costs. But the first option is absolutely free. At the same time, the correct placement of the router will significantly expand the coverage radius.
Where is the best place to place an access point
The first rule is to position your router in the center of the room. Thanks to this, you will not have remote rooms, all of them will be at an equal distance. The second step is to raise the router to the maximum height. It’s best to put it on a shelf under the very ceiling.
Wi-Fi is transmitted using radio waves, so the higher you place the antenna of the signal source, the wider the network coverage.
By following these simple rules, you can maximize the range of your Wi-Fi coverage. Moreover, without any financial costs.
In addition, reinforced antennas are available for sale. They have a standard mount and screw in instead of standard antennas. They are large in size. Due to this, the signal transmission distance increases.
Such equipment has the lowest cost from the list of devices required to amplify a Wi-Fi signal.
How to increase the range of Wi-Fi: Video
How to improve reception with signal amplifiers
These are devices that operate in bridge mode. That is, an increase in the range of Wi-Fi is as follows: the repeater connects to your access point and distributes its signal further. This way you can cover the whole apartment building. If necessary, you can use several repeaters. Configuring such a device is very simple.
To get started, plug it into a power outlet. Now connect your laptop or tablet to the signal booster over Wi-Fi. To enter the repeater settings menu, you will need to enter a username and password - admin, admin, respectively. This data may vary. You can find them in the instructions for the equipment.
You can learn more about connecting and configuring such a device in the instructions that come with the gadget. The fact is that each model has its own characteristics and it is simply impossible to describe universal settings. So, now you know how to increase the range of a Wi-Fi signal using a repeater (repeater).
Improving reception with a second router
It is worth noting that buying a second router will cost more than acquiring a repeater. However, sometimes users already have two routers or for some reason it is advisable to buy a second one.
In any case, it is worth remembering that not every model supports the "Bridge" function. Consider the configuration of this function using the example of the D-Link Dir-615 router.
When using a second router, Wi-Fi coverage is increased due to the creation of a separate home network, which is connected to the first access point.
As a result, you get two different networks, but with access to the Internet through the first (main) router. In other words, the second router connects to the first only for access to the global network.
So, connect to the access point via air or cable. To enter the options menu, you will have to enter the IP router in the address bar of the browser. You can find out the IP in the instructions for the gadget or on the device itself (there is a sticker with product information). Next, enter the username and password - admin, admin, respectively.
Click Advanced Settings. In the Wi-Fi section, select the Client item.
In this section you need to check the box "Enable".
A list of available connections appears below. Select the name of your first access point. Even lower, you must enter the password for the first network. After that, click the "Apply" button.
Weak WiFi signal is an urgent problem for residents of apartments, country houses and office workers. Dead zones in the WiFi network are characteristic of both large rooms and small-sized apartments, the area of \u200b\u200bwhich is theoretically able to cover even a budget access point.
The range of a WiFi router is a characteristic that manufacturers cannot unambiguously indicate on the box: the range of WiFi is influenced by many factors that depend not only on the technical specifications of the device.
This material contains 10 practical tips that will help to eliminate the physical causes of poor coverage and optimize the range of a WiFi router. It’s easy to do it yourself.
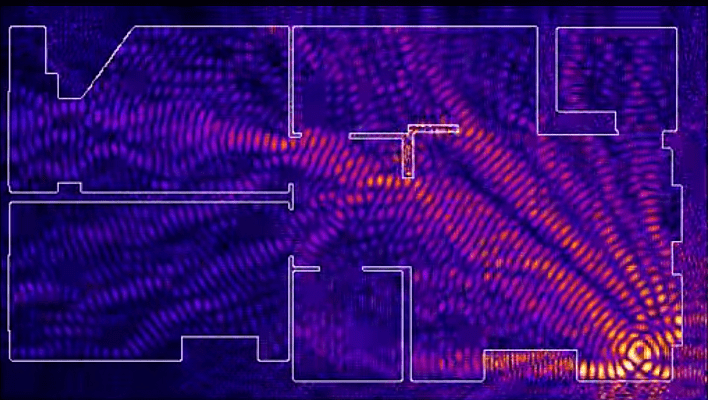
Radiation of the access point in space is not a sphere, but a toroidal field, resembling a donut in shape. For WiFi coverage within one floor to be optimal, the radio waves must propagate in a horizontal plane - parallel to the floor. For this, it is possible to tilt the antennas.

The antenna is the “donut” axis. The signal propagation angle depends on its inclination.

When the antenna is tilted relative to the horizon, part of the radiation is directed outdoors: dead zones form under the donut plane.

A vertically mounted antenna radiates horizontally: maximum coverage is achieved indoors.
On practice: Installing the antenna vertically is the easiest way to optimize your indoor WiFi coverage.
Place the router closer to the center of the room
Another reason for the occurrence of dead zones is the poor location of the access point. An antenna emits radio waves in all directions. In this case, the radiation intensity is maximum near the router and decreases with approaching the edge of the coverage zone. If you install an access point in the center of the house, then the signal will be distributed across the rooms more efficiently.
The router, installed in the corner, gives part of the power outside the house, and the distant rooms are on the edge of the coverage area.

Installation in the center of the house allows you to achieve a uniform distribution of the signal in all rooms and minimize dead zones.
In practice: Installing an access point in the “center” of the house is far from always feasible due to the complex layout, the lack of outlets in the right place or the need to lay the cable.
Provide direct visibility between the router and clients
WiFi signal frequency is 2.4 GHz. These are decimeter radio waves that poorly envelop obstacles and have low penetrating power. Therefore, the range and stability of the signal directly depends on the number and structure of obstacles between the access point and the clients.

Passing through a wall or ceiling, an electromagnetic wave loses some of its energy.
The amount of signal attenuation depends on the material that the radio waves overcome.
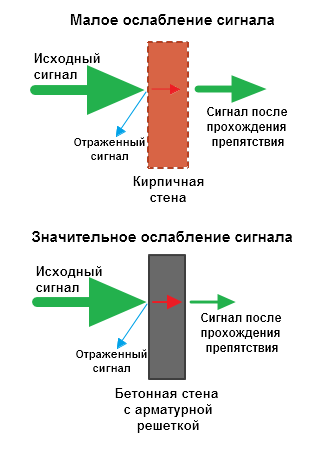

* Effective distance is a value that determines how the radius of a wireless network changes in comparison with open space when an obstacle passes through a wave.
Calculation example: WiFi 802.11n signal spreads in line of sight at 400 meters. After overcoming the non-capital wall between the rooms, the signal strength decreases to 400 m * 15% \u003d 60 m. The second wall of the same type will make the signal even weaker: 60 m * 15% \u003d 9 m. The third wall makes signal reception almost impossible: 9 m * 15 % \u003d 1.35 m.
Such calculations will help to calculate the dead zones that arise due to the absorption of radio waves by walls.
The next problem on the path of radio waves: mirrors and metal structures. Unlike walls, they do not weaken, but reflect the signal, scattering it in arbitrary directions.

Mirrors and metal structures reflect and scatter the signal, forming dead zones.

If you move the interior elements that reflect the signal, you can eliminate the dead zones.
In practice: It is extremely rare to achieve ideal conditions when all the gadgets are in direct line of sight with a router. Therefore, in a real home, the elimination of each dead zone will have to work separately:
- find out what interferes with the signal (absorption or reflection);
- think about where to move the router (or interior item).
Place the router away from sources of interference.
The 2.4 GHz band does not require licensing and therefore is used for domestic radio standards: WiFi and Bluetooth. Despite the low bandwidth, Bluetooth is still able to interfere with the router.

Green areas - stream from a WiFi router. Red dots are Bluetooth data. The proximity of two radio standards in the same band causes interference, reducing the range of the wireless network.
In the same frequency range, a microwave magnetron emits. The radiation intensity of this device is so great that even through the protective screen of the furnace, the magnetron radiation is able to “illuminate” the radio beam of the WiFi router.
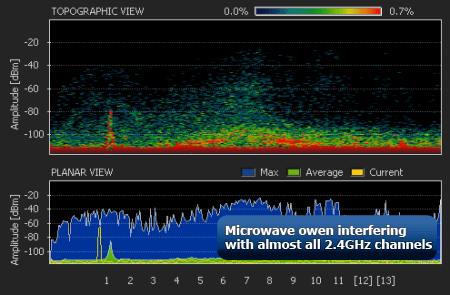
Radiation from a magnetron in a microwave oven causes interference interference on almost all WiFi channels.
On practice :
- When using Bluetooth accessories near the router, we enable the AFH parameter in the settings of the latter.
- A microwave is a powerful source of interference, but it is not used as often. Therefore, if it is not possible to move the router, then simply during the preparation of breakfast it will not work to call on Skype.
Disable 802.11 b / g mode support
In the 2.4 GHz band, WiFi devices of three specifications work: 802.11 b / g / n. N is the latest standard and provides greater speed and range compared to B and G.
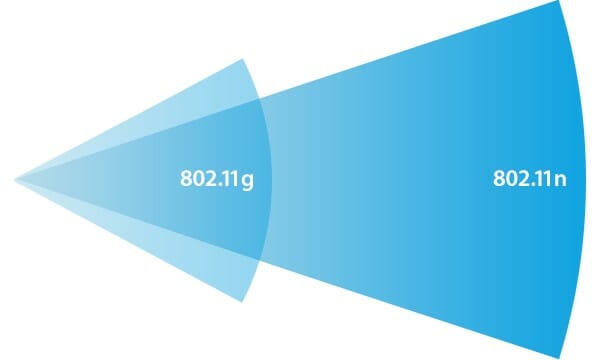
The 802.11n (2.4 GHz) specification provides longer range than legacy B and G.
The 802.11n routers support the previous WiFi standards, but the backward compatibility mechanics are such that when a B / G device, such as an old telephone or a neighbor’s router, appears in the coverage area of \u200b\u200bthe N router, the entire network switches to B / G mode. Physically, the modulation algorithm changes, which leads to a drop in the speed and radius of the router.
In practice: Putting the router in “pure 802.11n” mode will definitely have a positive effect on the quality of coverage and throughput of the wireless network.
However, B / G devices will not be able to connect via WiFi. If it is a laptop or TV, they can be easily connected to the router via Ethernet.
Choose the optimal WiFi channel in the settings
Almost every apartment today has a WiFi router, so the density of networks in the city is very high. The signals of neighboring access points overlap each other, taking energy from the radio path and greatly reducing its effectiveness.

Adjacent networks operating on the same frequency create mutual interference interference, like circles on the water.
Wireless networks operate within range on different channels. There are 13 such channels (in Russia) and the router switches between them automatically.

To minimize interference, you need to understand which channels the neighboring networks work on and switch to a less busy one.
Detailed instructions for setting up the channel are presented.

In practice: Choosing the least loaded channel is an effective way to expand the coverage area, relevant for residents of an apartment building.
But in some cases, there are so many networks on the air that not a single channel gives a tangible increase in the speed and range of WiFi. Then it makes sense to turn to method number 2 and place the router away from the walls bordering the neighboring apartments. If this also does not bring results, then it is worth thinking about moving to the 5 GHz range (method number 10).
Adjust the transmitter power of the router
The power of the transmitter determines the energy of the radio path and directly affects the radius of the access point: the more powerful the beam, the further it hits. But this principle is useless in the case of omnidirectional antennas of household routers: in wireless transmission there is a two-way data exchange and not only clients should “hear” the router, but also vice versa.
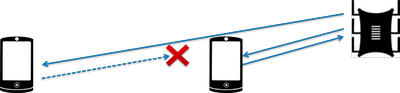
Asymmetry: the router “reaches out” to the mobile device in the far room, but does not receive a response from it due to the low power of the smartphone’s WiFi module. The connection is not established.
In practice: The recommended transmitter power is 75%. It should be increased only in extreme cases: the power turned out by 100% not only does not improve the signal quality in the far rooms, but even worsens the stability of reception near the router, because its powerful radio stream “clogs” the weak response signal from the smartphone.
Replace the standard antenna with a more powerful one
Most routers are equipped with standard antennas with a gain of 2-3 dBi. The antenna is a passive element of the radio system and is not able to increase the power of the stream. However, increasing the gain allows you to refocus the radio signal by changing the radiation pattern.

The higher the antenna gain, the further the radio signal spreads. At the same time, a narrower stream does not look like a “bagel”, but a flat disk.

There is a large selection of antennas for routers with a universal SMA connector on the market.


In practice: Using an antenna with high gain is an effective way to expand the coverage area, since the antenna sensitivity increases simultaneously with signal amplification, which means the router starts to “hear” remote devices. But due to the narrowing of the radio beam from the antenna, there are dead zones near the floor and ceiling.
Use signal repeaters
In rooms with complex layout and high-rise buildings, the use of repeaters is effective - devices that repeat the signal of the main router.


The simplest solution is to use an old router as a repeater. The disadvantage of this scheme is the half-throughput capacity of the subsidiary network, because along with the client data, the WDS access point aggregates the upstream from the upstream router.
Detailed instructions for configuring the WDS bridge are provided.
Specialized repeaters do not have the problem of bandwidth reduction and are equipped with additional functionality. For example, some Asus repeater models support roaming.

In practice: No matter how complicated the layout, repeaters will help you deploy a WiFi network. But any repeater is a source of interference. With free air, repeaters do their job well, but with the high density of neighboring networks, the use of relay equipment in the 2.4 GHz band is impractical.
Use 5 GHz band
Budget WiFi devices operate at a frequency of 2.4 GHz, so the 5 GHz range is relatively free and there is little interference.

5 GHz is a promising range. It works with gigabit streams and has increased capacity compared to 2.4 GHz.
In practice: “Moving” to a new frequency is a radical option, requiring the purchase of an expensive dual-band router and imposing restrictions on client devices: only the latest gadget models work in the 5 GHz band.
The problem with the quality of the WiFi signal is not always related to the actual range of the access point, and its solution in general terms boils down to two scenarios:
- In a country house, it is most often required in the conditions of free air to cover an area that exceeds the effective radius of the router.
- For a city apartment, the range of the router is usually enough, and the main difficulty is to eliminate dead zones and interference.
The methods presented in this material will help identify the causes of poor reception and optimize the wireless network without resorting to replacing the router or the services of paid specialists.
Found a typo? Select the text and press Ctrl + Enter
Wireless access points can be seen in offices. Flat boxes are designed for optimal wireless signal transmission. Network functions - Internet connection (network gateway), protection (firewall) and local area network management (IP address assignment and routing) - are performed by other devices.
Unlike a professional environment, a router in a private home network performs all network functions, including creating a wireless network. This means that you have to compromise, and the weaknesses are manifested most strongly in the operation of the network. Only the location of the router in most cases is determined not by the optimal coverage, but by the location of the network outlet. At the same time, the connected cables do not allow the device to be positioned high, which would ensure optimal conditions for a wireless network.
In addition, wireless technology is growing faster than everyone else. So, in a router five years ago, only the wireless network standard is out of date, and all other components still work quite well. In addition, the fine-tuning for most functions is available only in fairly expensive routers, which additionally tips the scales not in favor of a new (that is, expensive) model. However, affordable devices that work only in the 2.4 GHz band (for example, from the provider) can be retrofitted with modern 5 GHz technology using an access point.
Using Powerline technology, an access point can provide a wireless network to another floor or another part of the house
Access Points for Professional Wireless Networks
Access points with 802.11ac support cost about 6,000 rubles, that is, no more than a good wireless network repeater. Thanks to the powerful transmitter and more convenient location options, the access point can expand the coverage of the router network or completely replace it. If earlier these special functional stations were available only for experienced users (since they are designed for use as part of a complex infrastructure), then modern models additionally offer a convenient web interface for the basic configuration.
The new Netgear WAC510 device, which can be configured through a smartphone app, demonstrates that access points can be very easy to use. On the next two pages we will talk about testing this device, as well as the more affordable TP-Link EAP245 with 802.11ac support with a data transfer rate of 1300 Mbit / s.
 A professional access point kit includes a mount that allows you to install it on a ceiling, wall, or cabinet
 Connection and operating modes
Access points can fundamentally differently connect to the router and work in different modes, of which we identified four main ones.
\u003e Replacing the wireless network of the router. The access point is connected to the network port of the router (LAN) and to the power network (standard network twisted-pair cable is sufficient for network equipment with Power over Ethernet support). The access point forms a new wireless network. Computers and other devices that connect to it receive IP addresses and Internet access from the router, that is, they are on its network, as if they were connected to its Wi-Fi. In this case, you only need to perform a simple initial setup in the web interface of the access point. If the router and the access point work in the same room, the first is better to completely disable the wireless network so as not to interfere with the signal of the access point.
 The Netgear WAC510 access point provides for operation in router mode, in which it itself assigns IP addresses
 \u003e Extending the wireless network of routers. If neither the access point nor the router individually is able to spread the network throughout the apartment, it is worth trying to combine their efforts. Using a long twisted pair cable or Powerline adapter, place the access point where you want to optimize wireless coverage. In this case, in the web interface of the access point, you need to specify the same wireless network name (SSID) and WPA2 password as in the router’s network settings, but at the same time different channels - the more distant they are from each other, the better (for example, for a band 2.4 GHz channels 1 and 13).
Client devices will automatically find the strongest signal in their range, even if you move around with them around the rooms. Similar functionality is offered by devices called Powerline Wi-Fi Extender, designed to expand coverage: they combine a Powerline adapter and a wireless transmitter. The advantages of a “real” access point are larger antennas and more flexible location options (for example, installation on the ceiling or cabinet), which promises better signal transmission.
 In WDS mode, the WAC510 acts as a wireless network repeater, but first you need to configure WDS in the base router
 \u003e Instead of a repeater. If it is not possible to connect the access point to the router via cable or Powerline, you can optimize the router network using the Wireless Distribution System (WDS). An access point differs from a conventional repeater in larger antennas, which means the possibility of expanding the coverage area and increasing the data transfer rate.
\u003e Access point in router mode. Netgear WAC510 can be used as a router, with which you can not only form a network, but also manage it. However, to connect to the Internet, you need an Ethernet Uplink connection - for example, using a cable modem or LTE modem. The device is unable to establish a DSL connection on its own.
 Access point with configuration application
Router, WDS Repeater, or Access Point Only - Netgear WAC510 offers several options
Rich functionality: Netgear WAC510
This access point is easily configured with the Netgear Insight smartphone app. Given the relatively low cost, the device becomes attractive, including for private use.
 Using the Android and iOS Netgear Insight app, initial setup of the WAC510 is quick and easy
 In the simplest case, the first start-up process proceeds as follows. The WAC510 is connected via twisted pair cable to an existing router. On a tablet or smartphone connected to the wireless network of the router, the Netgear Insight application is installed, in which the assistant window is launched. Next, open the “Access Point | ... WiFi Discovery | Connect to WIFI ... | Discover Device ”, click on the access point, select the country in which the device works (this is necessary in order to determine which channels the access point can use), set the network name (SSID) and password of WPA2-PSK - that’s all.
Powerful web interface
After the basic settings, connect the client devices to the WAC510 wireless network. Cable devices can be connected through its optional network port. More detailed settings can be found in the WAC510 web interface. To open them, find the IP address of the access point in the web interface of the router. First of all, you need to change the default login password “admin / password” - they are in the menu “Management | Configuration | System | Advanced | User Accounts. "
Among the additional options of the WAC510, the WDS configuration, which is located in the Configuration section, can be given as an example. This technology allows you to combine multiple access points into a single wireless network with centralized management - detailed instructions are in the user manual. You can configure the WAC510 to use as a router through the “Configuration | System | Basic ”- all configurations, including the name of the wireless network, are completely reset there.
 For those who wish, the Netgear web interface provides the ability to configure all the intricacies of a wireless network
 Practical testing of the configuration and use of the WAC510 web interface left a good impression, although for the application of changes (primarily for restarting) the device sometimes required a little more time than we would like. Performance measurements using the JPerf benchmark on the HP Pro X2 tablet using the Intel AC 8265 Wi-Fi chip were a little disappointing at first, especially in the 2.4 GHz band, which runs older smartphones, TVs and other simpler client devices. Netgear access point reached the highest speed, and evenly in all directions, when the client device was nearby and at the same level with it.
That is, the signal radiation is obviously optimized more for uniform coverage of the surrounding area than for directional action in one direction, therefore a network with several client devices will demonstrate good performance if these devices are successfully distributed in space. At the same time, Netgear's maximum performance far exceeds the capabilities of old weak routers and repeaters. Power consumption in standby mode is about half the power of a full-fledged wireless network router, and during data transfer it almost does not increase (from 4.3 to about 4.5 W).
 Netgear WAC510 vs. TP-Link EAP245
TP-Link hotspot delivers better performance, while Netgear offers more options with multiple features
At high speeds: TP-Link EAP245
In appearance, the TP-Link EAP245 resembles Netgear (and many other access points). But here, through a twisted pair cable, you can only establish a Uplink connection with a router (WAN), and it is impossible to connect a client device. In addition, it is not intended to use the device as a repeater and there is no configuration application for a smartphone.
 Wireless specialist
The TP-Link EAP245 offers fewer features than Netgear, but this device’s wireless network is more powerful and cheaper.
But TP-Link costs a little cheaper than Netgear, and in the 802.11ac standard it reaches the data transfer rate not of 866, but as much as 1300 Mbit / s. The easiest way to configure is in the web interface. The IP address can be found, as is the case with Netgear, in the web interface of the router. At the first start, first set the username and strong password for the web interface. The input system works orderly, responds instantly, and the device quickly applies the changes.
 Attention: for TP-Link EAP245, you first need to additionally activate WPA encryption for both the 2.4 and 5 GHz bands
 The real lack of security of the device is that by default it creates two open networks (in the 2.4 and 5 GHz bands), for the protection of which it is necessary to take separate measures. To do this, on the “Wireless” tab and then “SSIDs”, click on the notepad icon next to “Modify”. Indicate the name of the wireless network (SSID), for “Security Mode” select “WPA-PSK”, for “Version” - “WPA2-PSK”, enter a strong password for “Wireless Password” and confirm the changes by clicking the “OK” button below. Then, at the top of the page, switch to the 5 GHz network and repeat the same.
Access Points: Assortment
Due to the great popularity of access points in the business segment, the range of these devices is very wide, especially from specialized network equipment suppliers such as D-Link, Lancom or Ubiquity. Such devices cost more than 10,000 rubles and offer wide functionality that is not used at home. Therefore, for testing, we chose two available simple models from Netgear and TP-Link.

High speed wireless
All other default settings of the EAP245 are intuitive. Some options may be interesting for commercial use of the device, for example, a splash page with terms of use. Practical for home use is the Scheduler function, which enables and disables the wireless network according to the schedule.
 EAP Controller centrally manages dozens of access points
 In terms of performance, the EAP245 access point impressed with both the results on the 802.11ac 5 GHz network and 802.11n 2.4 GHz. Compared to Netgear, the power of the TP-Link guided signal is greater - the maximum speed was achieved when the panel with the logo was facing the client device. But thanks to the large speed resources in the use case in which we measured, TP-Link was faster than Netgear in all directions.
All in all, TP-Link's EAP245 is a good choice for those who need a clean access point with the highest possible performance at a low price. Buying a Netgear WAC510 will pay off in cases where, first of all, the device should be simple (with control from the application) or used not only as an access point, but also as a router or WDS device. One way or another, professional devices once and for all will solve almost all the problems of coverage and transmission speed.
Photo: manufacturing companies; CHIP Studios / Simon Kirsch
Internet on Android