If you are a user of an Android phone, tablet or smartphone, it is almost inevitable that at some point you will run out of free space.
Don't worry - there are a few simple steps to ensure you can install apps on your memory card.
Today, smartphones and tablets have begun to take on a greater role in our lives and the problem of data storage has become more pressing.
Not taking a lot of pictures or moving them to a computer or to the cloud solves the problem, but the best thing would be to install applications and everything else on an SD memory card, which greatly expands the capacity of the devices.
To install or move apps to your storage card, there are several possible scenarios you can consider.
Some of them depend on the currently installed firmware version, others have restrictions imposed by the developers.
In addition, it is not unimportant that an application installed on a memory card will work slower than on the internal one.
Therefore, it would be better to use this solution only for programs that are not needed very often or those whose effectiveness does not necessarily depend on the storage location.
How to install applications on a memory card in Android 6.0
Converting an SD card into an internal storage medium is a new concept introduced in Android 6.0.
This solution differs from the traditional way of using cards in tandem from a phone or tablet in several ways.
By default, you have the option to use a flash drive to store movies, music or photos. In addition, you can copy a lot of things to it from your computer.
Converting an SD flash drive into an internal storage medium makes the device recognize it as a place to store applications and data obtained through those applications, in addition to photos, music and movies.
From that point on, you take the step where the card will store applications unless the developer explicitly prohibits it.
By the way, it's worth knowing that you can move applications from the internal memory at any time, regardless of whether you want it or are convinced that it will work faster.
The big problem with converting a flash drive to internal memory is that it will have to remain in the phone at all times and cannot be used by any other portable device or PC.
Moreover, if you remove it, there is a high chance that the proper functioning of the device will be affected.
All these limitations are due to the fact that the flash drive is formatted in the EXT4 file system and Linux systems encrypt data using the AES 128-bit algorithm.
The most important aspect that you should note in all this information is that it would be good to back up your data before starting this process.
NOTE: It is a good idea to use a flash drive from a reputable brand, SanDisk, Kingston, Samsung, Sony, etc. but in any case, the installation wizard that is included with the operating system will check performance.
First steps to installing applications on a flash drive in Android 6.0
When you connect a flash drive, a “master” should appear. In the first step, it will ask if you want to configure the new memory card as an internal or removable drive.
In this particular case, we are developing a scenario in which we check the box next to the line “Use as internal memory”.
Please confirm that you agree. Then you will be offered another confirmation that if there is your data on the flash drive, it will be deleted.
The final step will involve actually formatting and encrypting the external drive.
Finally, to make the process easier, you will be asked to move most of the data that can be transferred from the internal memory to the formatted one.
If you do not want to move applications to a memory card, but only images, movies and documents, then it is better to choose a flash drive as a portable storage medium.
How to move applications from internal memory to sd card on android
To move, click “Settings” and go to the “Memory” section.

There we select “Device memory”.

Then click “Browse”.

Now at the very top right, select “Options” and click “Change”.


Now click “Options” again, click “Move” and select “Memory Card”

Now create a folder or select an existing one.

Now one click at the very top right on the word “Done” and wait for the process to complete.

NOTE: developers often independently make changes to the base version of Android, so if the built-in method does not work, .
Moving apps to the memory card in older versions of Android
Depending on the device interface installed by the manufacturer, the procedure may differ. On Nexus, look for the “Device Manager” and “Application Menu” sections. On a Samsung, in Settings, click "Applications" and go to "Application Manager."
You will be prompted for several actions. You can ignore them, just click "Move to SD card" and wait a bit.
Find the apps that are taking up the most space and repeat the process.
Soon you will have a lot of space. It is quite possible that moving to an SD flash drive will not work.
You will receive notifications that the software developer has decided to prevent it from moving back and forth. Good luck.
(3
ratings)
If your device does not have enough internal memory, can use SD card as internal storage for your Android phone. This feature, called Adoptable Storage, allows the Android OS to format external storage media as permanent internal storage. The information on the installed SD card is encrypted and cannot be subsequently used on another device.
SD Card is a very convenient option for storing photos, songs and videos. Even if you have a large amount of internal memory on your Android smartphone, you may always need a large chunk of memory to store long videos captured by your phone's high-definition camera.
It is important to know
There is one drawback, the SD chip can lag when recording high-definition video.
Android by default in the internal memory and only occasionally uploads data to the SD card. This way, you are prevented from installing any additional applications if your phone is running low on internal storage space, for example, in the case of budget Android One devices.
What is storage storage?
Storage storage is the main memory of your smartphone, but if necessary, it can be expanded using an SD card. This on Android it is called Adoptable Storage. This will allow you to use the removable microSD card installed on your Android phone as your primary storage. This way, you can easily solve the problem of how to make an SD card the main memory on Android and overcome the lack of space if the phone has a small internal volume.
Features of using the card as the main storage
There are a number of important features that should be taken into account during this procedure.
Will be useful
When using a storage device, be it an SD flash drive or a USB drive, it is important to remember what format the device is in and whether the Android operating system supports it, and there are four main file format types: FAT32 or exFAT, ext4 or f2fs.
How to change phone memory to android memory card? The question is not entirely correct, it is impossible to completely replace it, you can only “increase” additional volume.
Using your SD card as your main storage can be a great solution for music lovers and those who like to watch TV shows on the way to work or on a long trip. But, as often happens, memory expansion always depends on the cost of the required device, after all, they differ both in speed and in volume, as well as in the adaptable information storage function. Here are some nuances that can be viewed from different angles - both negative and positive:
How to use SD card as internal memory on Android?
How to replace the phone's internal memory with an external SD card on Android? Configuring your SD card to act as internal storage on Android is essentially a fairly simple process. There is nothing complicated about this and you will see for yourself later.
It is possible that the Adoptable Storage function is not supported by your device, even if the smartphone runs Android 6.0 or higher (this can happen, it all depends on the model and brand of the smartphone). The device manufacturer may have disabled this feature. However, there are command line methods that allow you to force the use of a flash drive to store data.
Below are the basic formatting steps.
On the next screen you have one last chance to decide for yourself if you want to change your mind

It is important to know
Don't forget to back up your data; after formatting, the information will disappear without a trace!

Once the formatting process is complete, you can use the removable SD card as a “temporary” or “removable” permanent location. But keep in mind that hot swapping and ejecting will no longer be available as you may have previously done. That's why Do not remove the flash drive without using the Eject parameter. In addition, you can practically delete the place accepted by the operating system, which, accordingly, is not recommended, since this can cause certain errors in the operation of the device. Now you know how to make a memory card the main memory on Android.
How to make the storage a regular flash drive again?
If you want, you can Undo changes made using the Adoptable Storage feature. Follow these steps:
- Follow the above method until the “Tap name...” step.
- Click on it.
- Click the three dots in the top right corner of the screen.
- Click "format as internal".
- Click Format. The process will take no more than a few minutes.
Now you can use the SD card as a portable storage device and mount it on any other Android device.
Do you want to use your MicroSD card as a real storage expansion and install apps on it? To do this, you need to format it as internal memory. This is quite easy to do on most phones, but unfortunately some manufacturers, such as Sony, LG or Samsung, do not have this feature by default. But if your smartphone is equipped with Android Marshmallow or newer, then you can use the command line. However, after this, avoid Android updates. We will tell you how to combine memory correctly in this article.
Go to:
Easy way
If you're lucky, your smartphone will allow you to do this without connecting it to your PC. This method will most likely be your only hope if you are using a newer version of Android (7.0 Nougat or 8.0 Oreo). Here's how to check:
- Insert the SD card into your Android phone and wait for it to be recognized
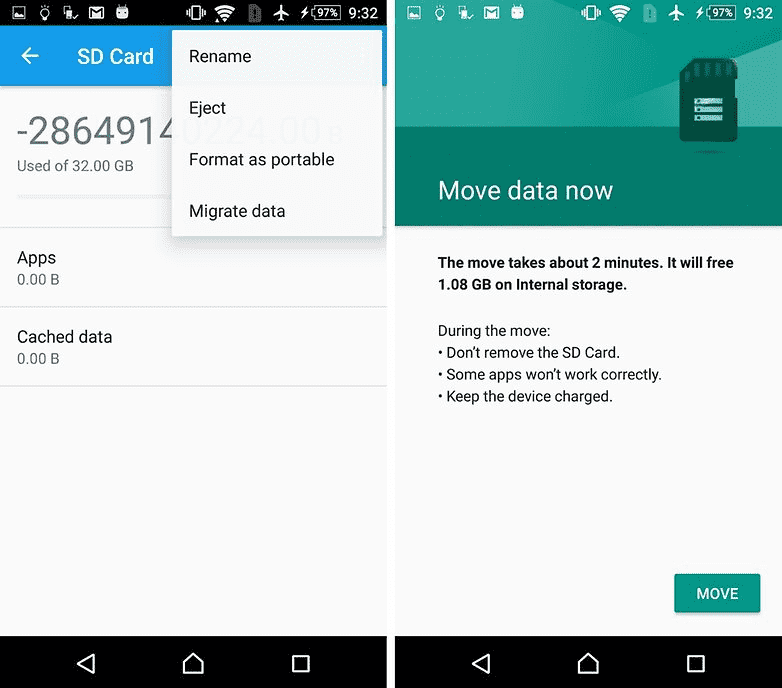
- Open Settings > Storage
- Tap your SD card's name.
- Tap the three vertical dots in the top right corner of the screen.
- Click "Settings" .
- Select Format as internal memory.
- Click "Clean and Format"
- Android will then prompt you to transfer your data
If your smartphone doesn't allow you to do this, the process becomes more difficult. We'll get to it below.
What to do if your phone doesn't allow you to format microSD as internal storage
Some smartphone manufacturers disable the normal Android feature for formatting microSD as internal storage, hiding the ability to do so from your phone. But you can still activate this process using a PC without requiring any root privileges.
The exact steps vary depending on the Android version of your phone. This method worked well on Android 6.0 Marshmallow and Android 8.0 Oreo, but we encountered difficulties on Android Nougat.
For phones using Android 6.0 Marshmallow
When the MicroSD card is formatted as internal memory, applications can be stored entirely on it. This means that if you download an application with a total size of 2 GB, then there should be 2 GB of space on the SD card. If, however, the MicroSD card is formatted only as a backup, there will not be enough memory, as it writes PLATYPUS_DIARRHEA on Reddit.
Just because a menu option is invisible doesn't mean it doesn't work. A few days after the publication on Reddit, it became known that the command line can also format a MicroSD card as internal memory in the Galaxy S7. We successfully tested the instructions with a Samsung Galaxy S7, Sony Xperia Z5 and LG G4 running Android 6.0 Marshmallow.
All three smartphones run Android 6.0 Marshmallow out of the box or after an update and have a MicroSD card slot. Additionally, there is no menu option to format the MicroSD card as internal memory. The feature is only available on HTC One A9 and Motorola on all Moto smartphones.
Why did Samsung, LG and Sony hide this item? I connected each of the three smartphones to the computer, and each of them had one MicroSD card.
Then I entered in the commands described in my blog. Once you open a command prompt window and connect your smartphone, you can enter the first command:
- adb shell
Now the command prompt is ready to run system commands on your smartphone. In this case, we want to format the SD card or part of it as internal memory. Even if Sony, Samsung and LG deny us this option in the GUI, we can still execute this command through the console. First, however, we need the SD card ID. You can find it out with the following command:
- sm list-disks
In my case the disk is called 179.64 . Perhaps yours is different. Please note the exact ID. In the next command we will format and partition the MicroSD card. Your content will be deleted. If there are important files on the card, copy them to another drive or computer. If you want to keep a MicroSD card in your smartphone all the time, you can now partition all your memory. To do this, enter:
- sm partition disk:179.64 private
The operation takes a few seconds or minutes, depending on the capacity of the memory card. If you only want to use a certain percentage so that other devices can read it, you must exclude it from the private section. The 50:50 split command looks like this:
- sm partition disk:179.64 mixed 50
This is the end of Paul O'Brien's leadership, but not the end of the job. If you now want to use the re-allocated memory, you must migrate your applications and data as well. This can be done through the "Storage" section in the Android settings menu. Select your MicroSD card, then go to the top right side of the menu and click "Move Data". You cannot select this menu item before splitting.
Now all downloaded applications will be completely written to the MicroSD card. Only system applications and updates use internal memory. This means you will never receive an error message due to out of space.

Smartphones with Android Oreo
Recent Android updates have changed the rules a bit, but you can still use this method with ADB. Just start working with ADB using the method above, but after entering shell adb you will be prompted to set certain values.
Enter the following lines to unlock the ability to format microSD cards as internal storage on your phone:
G8141:/ $ sm set-force-adoptable true
G8141:/ $ sm list-disks
- disk:179.0
G8141:/ $ sm partition disk:179.0 private
G8141:/ $ sm set-force-adoptable false
G8141:/ $ exit
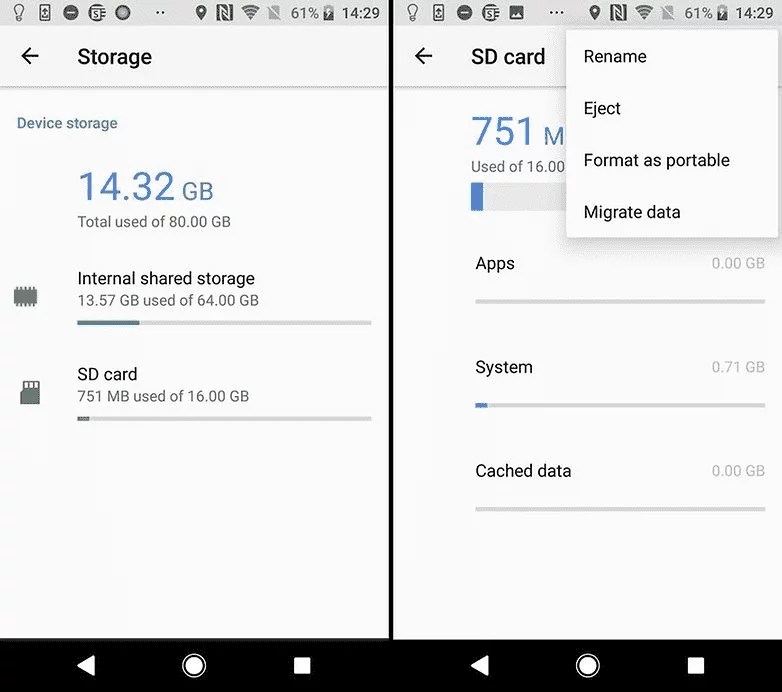
We tested this method on a Sony Xperia XZ Premium running Android 8.0 Oreo and it worked. In the screenshots below you can see a 16GB microSD card installed as internal memory:
Problems with system updates and Nougat
Some readers have reported difficulties installing system updates on Android 6.0 after using the above methods. Updating to Android 7.0 Nougat is not possible after installing MicroSD as internal storage. Our test devices running Android 7.0 Nougat don't even respond to the console commands shown above.
Due to the lack of documentation online, we can only recommend performing a number of operations before updating the system. Back up your photos or music to your computer or the cloud and free up as much memory on your SD card and smartphone as you can.
Remove unnecessary applications and return data to internal memory. Then format the MicroSD card as removable storage. Only then will you be able to install the Android update safely.
What's the catch?
MicroSD cards are not as fast as the built-in memory of a smartphone. So don't waste your money on cheaper ones and instead buy yourself memory cards with reasonable read throughput. Extreme Pro and MicroSD from Sandisk turned out to be, in our opinion, the best in terms of price/quality ratio. With 74MB/s write throughput, you shouldn't experience any lag. Such cards are best suited for installation as internal memory
Interestingly, only the LG G4 was able to read the extended memory correctly. Samsung showed an unnaturally large amount of occupied memory, and Sony's memory was even negative. However, we didn't have any complications, and even when we were connected to the computer, we were able to access all of our data properly, although we could only see a general part of the memory and not a specific part. Difficulties arose only when the system was updated (see above).
Memory expansion: complete success
We subjected all the smartphones described above to the same endurance test. We have installed Final Fantasy IX on all devices. The game size is 1.8 GB. After installation, it is easy to see which of the two types of memory, internal or SD card, was used. In all cases, there is 1.8 GB less space once installed on the SD card. This degree of success cannot be achieved with SD cards formatted as external memory, as complete data migration is not possible.
Compare the internal memory and SD card memory values in the screenshot to confirm.

What happens if you remove the microSD card?
Of course, the question is what happens if the MicroSD card disappears from the system. In fact, this creates a serious problem for your applications. Eventually, they can no longer access their data. Since your operating system partitions and factory reset information are still stored in the internal memory, a removed or broken SD card cannot cause much harm. When we removed the MicroSD card, the application icons simply disappeared, and when we reinstalled them they came back.
If you lose your SD card or break it, your data will be lost. Since they are encrypted as internal memory, you may have no hope of recovering the data. Instead, use regular backups. So go ahead and enjoy cheap memory expansion for your Marshmallow smartphone.
Safely Removing Internal Broken SD Card
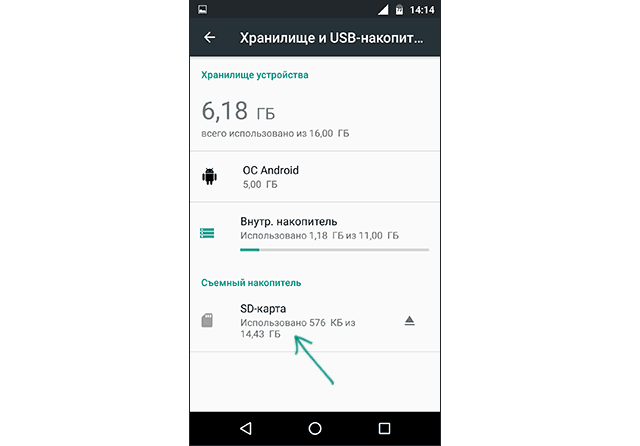
To safely remove the SD card from your smartphone, you must reverse the above process. Since your internal storage space is likely insufficient, you'll first need to transfer photos and other data to another storage location, such as your PC's hard drive.
Then go back to settings "Storage and USB Drives" and press "Move data to internal memory" on the menu. Then format the SD card like external memory. Do both steps (backup and format) so that your data cannot be lost and you can use the SD card with other devices.
Most modern smartphones are equipped with a memory card slot. Xiaomi is no exception. The presence of this function allows you to save important information on the device (music, photos, documents, notes), expand its capabilities and functionality, and also use the mobile device as an external storage device. When Xiaomi does not see the memory card, owners face some difficulties, especially if the phone was a way to store data for school or work.
What to do first
If you decide to immediately format the card or take the gadget in for repair, do not rush to do it. First, insert the SD into another device (tablet or computer) and check its operation. These simple steps will help you figure out whether the problem is with your phone or your removable storage device. Only after this can you choose a solution.
If possible, test another memory card with your smartphone; it is quite possible that both devices are functioning properly.
What could be the reasons for the breakdown?
Sometimes the violation may lie directly in the smartphone. To restore the functionality of the flash drive, copy the information to a computer or other device, follow these steps (depending on the situation):
- Smartphone software crashes. Remove and insert the flash drive back, reboot the gadget. System operation will be restored.
- Xiaomi does not support SD from some manufacturers or, due to its limited capabilities, cannot work with high-capacity drives. Study the technical parameters of the gadget; perhaps it cannot handle memory cards larger than 8 GB, but you offer it 32 GB. It is worth noting that sometimes correct operation is not possible due to the type of file system.
- Broken contacts in the slot. When Xiaomi does not see the storage SD card for this reason, remove the card and insert it back. If the problem occurs repeatedly, you should take the gadget in for repair. Fixing a breakdown takes a few minutes and is relatively inexpensive.
How to restore functionality
When an SD card fails, the following reasons can be noted:
- The flash drive memory is full. Take it out of your phone and open it on your computer, deleting unnecessary files or saving them on your computer. By freeing up space on the drive, you will restore the functionality of the device;
- Virus infection or incorrect file system format. You need to format it on your phone or computer. With this method of solving the problem, the data on the device will be lost.
To format using a smartphone, follow the following algorithm:
- go to the Menu and select the “Memory” section;
- select the “Remove memory card” or “Clear memory card” function and wait for the process to begin;
- After formatting is completed, the “Connect SD card” function will appear.
Depending on the Xiaomi model, the name or order of functions may change.
To format using a computer, you should adhere to the following algorithm:
- connect the card to the computer using a card reader;
- On your computer, open the “My Computer” section (the icon is located in the Start menu or on the desktop), select SD, which is usually displayed as a flash drive (or removable disk);
- By right-clicking on the flash drive, a menu will appear in front of you where you need to select the “Format” function;
- click the start button and wait until the formatting is completed;
- done, the memory card should restore its functionality.

A smartphone may not see SD for various reasons, and this is not always a serious problem. However, if none of these methods work for you, your best bet may be to contact a qualified repair professional. You should not disassemble the gadget yourself and try to repair it.
Today we will talk about automatically installing applications on a memory card for tablets running Android. Devices from Apple, due to the lack of a MicroSD slot, are immediately eliminated - they are limited by the amount of built-in memory, so they have to store some of the data on the cloud. Whereas in most Android tablets this slot is present. Let's say more, recently gadgets have begun to support memory cards with a capacity of up to two terabytes! And no, we didn’t mistype it - it’s really true.
If the method below does not work for you, then try the one we wrote quite recently.
Why are applications not saved to the memory card?
We hasten to disappoint you - in some devices it will not be possible to allow automatic installation to MicroSD using software. In particular, this applies to devices running Android 4.4.2 and higher – right down to the “marshmallow”. Fortunately, there is third-party software that allows you to do this. But let’s not rush things – we’ll find out about everything in order.Find out the Android version
Well, now let’s put everything into pieces. First, we need to find out the Android version.

Go to the menu;
- Go to “Settings”;
- Scroll to the very bottom and click on the “About phone” item;
- In the submenu that opens, look for information on the version;
In this case it is Android 5.1.1. This method is suitable for both smartphones and tablets. As a matter of fact, on this device, without “external” intervention, it will not be possible to ensure that all applications are automatically installed on the card. But, as you have already noticed, we have third-party firmware with built-in Root rights.
With their help, you can easily install additional software, which, working in the background, will “scatter” all the files from programs and games across a flash drive.
Saving applications to a memory card for Android 2.2 – 4.2.2
Everything here is extremely simple and banal:

1. We still go to the menu and look for “Settings” there - the icon, as a rule, resembles a gear in appearance - there should be no problems finding it;
2. Next, look for the “Memory” sub-item. In our case, it is located between “Screen” and “Battery”. The menu may differ depending on the device manufacturer. The screenshot shows an example of a clean version of Android, without shells that are preinstalled at the manufacturing plants;
3. And now the most important thing - tap once on the “SD card” item, located below the inscription: “Default recording disk”. On the contrary, a circle or a tick should appear;
4. Profit! Now all applications downloaded through the Play Market will be automatically installed on external memory.
By the way, if the flash drive is slow, and there are such things, then applications may not work correctly. So buy a good SD card - don't skimp.
What to do with devices running Android KitKat and higher?
Unfortunately, you won’t be able to do this without obtaining Root rights. Google has officially stopped supporting this feature in new versions of the operating system. The fact is that cloud services are becoming more widespread and, as a result, problems with insufficient memory should not arise. But in our country there is no such high-speed Internet as in the USA, and traffic is not cheap, so clouds are not in demand.Is there any way to make sure that applications are automatically installed on the memory card? As we said above, this is real.
If you have a tablet from one of the Chinese companies, then it probably already has built-in Root rights, but you will have to tinker with other manufacturers. Naturally, in the course of this article we cannot talk about obtaining them, because the process for each gadget is unique - the instructions can only fit into a multi-volume book. But oh well, it doesn't matter.
You can contact a specialist with a request to install Root rights or do it yourself at home. The last option is the most risky; there is a chance to turn your gadget into a so-called “brick” and they can only restore it in one of the service centers. However, if you have already carried out a similar procedure, there should be no problems. As a last resort, on the Internet you can also find solutions to these same problems. So, go ahead and experiment!


- Somehow we have strayed quite far from the main topic of the article. So, let's return to the instructions: Using any of the possible methods (flashing, unlocking the bootloader, etc.) we get Root rights;
- Go to Google Play;
- In the search bar we write: “SDFix: KitKat Writable MicroSD” - this is the assistant application that will be useful to us in the future. Let's install it. We hope this doesn't need to be explained to anyone? Just tap once on the “Install” button and the process will take place automatically, after which a shortcut to launch will appear in the menu;
- We open it and see a bunch of, most likely incomprehensible, inscriptions in English. There is no need to translate them - everything is resolved in a few clicks;
- Click on “Continue”, as shown in the first screenshot;
- We tick our agreement that by clicking the “Continue” button, the device will be slightly modified;
- We wait literally a couple of minutes until the orange screen changes to green.
- On the green screen we are informed that automatic installation of applications on the SD card has been successfully enabled.


